Sweet and Spicy Monkey has moved to: www.sweetandspicymonkey.com

Showing posts with label caramel. Show all posts

Friday, September 11, 2015

Caramel Apple Scones


While everyone else is blogging about pumpkin right now, I thought I'd slow it down a little by not jumping into October just yet. Take some time and savor September by starting with a recipe with that other fall favorite, apples.

Apples are taking a back seat to pumpkin these days. You would think pumpkin is some kind of new Star Wars memorabilia the way others are going ga-ga over it!

Sorry, but pumpkin has been around forever, like back when Christ was really walking the earth days, forever.

Of course, so was the apple, but you don't see people going ga-ga over apples anymore. At least not until you try my Caramel Apple Scones!


These scones remind me of baked apple pie with that cinnamon apple pie flavoring....Mmmm! And if that isn't enough, add in some caramel bits, drizzle caramel sauce over the top and these scones just scream Fall!

So let them eat their pumpkin, I'll get around to making something pumpkin soon. But for now, we're celebrating the upcoming Fall season with apples. And not just apples, but caramel and apples.


Step aside pumpkin....

Caramel Apple Scones
Recipe by Julie Murphy
A taste of Fall in these Caramel and apple scones.
Prep time: 15 minutes
Cook time: 10 to 20 minutes
Total time: 1 hour and 30 minutes
Yield: 8 scones
Ingredients
  • 1 and 3/4 cups + 2 Tablespoons all-purpose flour
  • 1 Tablespoon baking powder
  • 1/2 teaspoon baking soda
  • 3/4 teaspoon sea salt
  • 1 Tablespoon apple pie spice
  • 1/2 teaspoon ground cinnamon
  • 5 Tablespoons coconut oil, frozen
  • 1 cup canned coconut milk, full fat
  • 1/4 teaspoon vanilla extract
  • 4 Tablespoons pure maple syrup
  • 1 egg
  • 1 and 1/2 cups caramel bits
  • 1 baked apple (recipe below)
Directions
  1. Preheat oven to 450F degrees.
  2. Prepare cookie sheet with parchment paper. Set aside.
  3. In a large mixing bowl, add all dry ingredients - flour, baking powder, baking soda, salt, apple pie spice, and cinnamon.
  4. Blend together with a fork.
  5. Using your mixer, with correct attachment for dough making, a pastry fork, or using your fingers, work in pieces of frozen coconut oil until dry mixture becomes crumbly.
  6. Mix in coconut milk, vanilla, maple syrup, and egg.
  7. Using your mixer, knead for about 5 to 10 minutes or until dough is combined.
  8. Fold in baked apple (recipe below) and caramel bits. Gently blending in throughout dough.
  9. Dough will be sticky. If dough is too sticky, add more flour, 1 Tablespoon at a time until you get desired mix. You don't want dough to be smooth in texture like normal bread dough, as the rough texture helps to give scones their famous scraggly looks.
  10. After kneading dough, remove from bowl, and place on a flat, floured surface.
  11. Work the dough with your hands for about 1 to 2 minutes.
  12. Shape dough into a round shape with your hands. Lightly roll with a floured rolling pin, sprinkling more flour on dough to prevent dough from sticking to rolling pin or surface. You want dough to be at least 1/2 inch thick. The thicker your dough, the higher your scones will rise. But remember, you want your scones baked all the way through with no raw dough in the middle, so not too thick.
  13. Tidy up the outside edges with your fingers, keeping in mind you want the edges somewhat rough, since that is the beauty of a scone.
  14. Sprinkle flour on the edges of a large knife and cut your dough into pieces, similar to pizza slices.
  15. Gently transfer each piece of dough onto your prepared cookie sheet (a pie spatula works great for this), leaving 1/2 inch between each piece of dough.
  16. Place into preheated oven and bake for 10 to 20 minutes, or until tops are lightly browned.
  17. Remove from oven. Gently loosen scones from parchment paper and let cool.
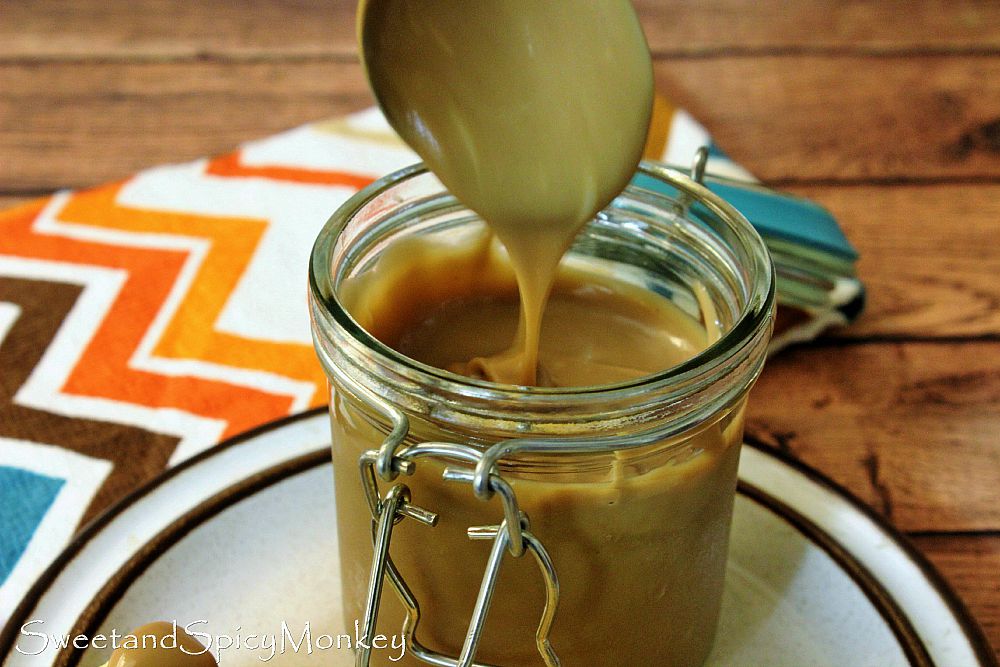
  18. Drizzle caramel sauce over the top before serving.
  19. Best served warm with butter, cream cheese, or mascarpone cheese with coffee or tea.


Baked Apple - single serving

Recipe by Julie Murphy
Baked cinnamon apples.
Prep time: 10 minutes
Cook time: 60 minutes
Total time: 70 minutes
Ingredients
  • 1 apple
  • 1 teaspoon organic brown sugar
  • 1/2 teaspoon honey
  • dash nutmeg
  • dash apple pie spice
  • dash ground cinnamon
  • 2 Tablespoons water
  • dash pink Himalayan salt
Cooking Directions
  1. Preheat oven to 350F degrees.
  2. Prepare small baking dish by spraying with a non-stick cooking spray or lightly wiping down with coconut oil. Set aside.
  3. Wash apple and rinse. Remove core and seeds from apple. If you prefer skinless apples, remove the skin at this time.
  4. Cut apple into small pieces. Place into small mixing bowl.
  5. Combine remaining ingredients with apple pieces and mix well.
  6. Pour into prepared pan. Cover with aluminum foil.
  7. Bake for 1 hour at 350F degrees or until desired texture. I prefer my apples a little softer since we're adding them to the scones. You can always remove the apples from the oven earlier if you prefer a little crunchier apples.
  8. Remove from oven and let cool to room temperature before adding to scone mixture.
 
All content and images are property of Sweet and Spicy Monkey. Please do not reprint this content without my permission. If you wish to include this recipe on your site, please re-write in your own words and use your own photographs and link back to this post for original recipe.
Follow Julie's board Sweet and Spicy Monkey on Pinterest.

Tuesday, September 8, 2015

Salted Caramel Sauce - Paleo, gluten-free, dairy-free, vegan

Remember last year about this time when I shared the caramel sauce from Faith over at Edible Mosaic? A caramel sauce that's so awesome it should be called "Awesome Sauce."

An easy, homemade caramel sauce that is such a better alternative to the sugar-laden filled caramel sauce you buy at the stores.

Last years Salted Caramel Sauce

Well, I just did it better! I cut the butter and used coconut oil so now it's not only paleo friendly, vegan and gluten-free, but it's also dairy-free. And since awesome sauce is already taken, I'm calling this one "Super Awesome Sauce."


But don't just take my word, go make some yourself and you'll see what I'm talking about. Just consider yourself warned as you will want to put this caramel sauce on everything you eat.
E-V-E-R-Y-T-H-I-N-G.

Or maybe just eat it out of the jar.


Don't say I didn't warn you!

Salted Caramel Sauce - Paleo, gluten-free, dairy-free, vegan

Recipe by Julie Murphy
A dairy-free, gluten-free, vegan, and paleo friendly Salted caramel sauce.
Prep time: 5 minutes
Cook time: less than 1 hour
Total time: 1 hour
Yield: 1 and 1/2 cups
Ingredients
  • 1 can unsweetened coconut milk, full fat
  • 1/4 cup pure maple syrup
  • 1/4 cup organic coconut sugar
  • 1 teaspoon vanilla extract
  • 1/2 teaspoon sea salt
  • 1 Tablespoon organic virgin coconut oil
Cooking Directions
  1. In a medium saucepan, add coconut milk, maple syrup, and coconut sugar. Bring to a boil over medium heat, stirring constantly with a whisk.
  2. Bring to a rolling boil while you continue to whisk mixture. Turn heat down slightly, while still maintaining a boil. Continue whisking so mixture will not burn. (Nothing taste worse than burnt caramel, just saying, not like I've done this).
  3. Mixture will become thicker and darker in color as it continues to cook.
  4. When it becomes darker in color and the amount of mixture seems to be reduced to 1 and 1/2 cups (this takes approximately 45 minutes), remove from heat and stir in remaining ingredients of vanilla, sea salt, and coconut oil.
  5. Let cool before serving.

*Helpful Hints*
 
- You can use honey instead of maple syrup.
 
- Makes for a delicious dip for apples and pears. Can be served over ice cream, cakes, pies, popcorn, cookies, pancakes, waffles, and French toast.

- Store in an air tight container for up to 3 weeks in the refrigerator.

All content and images are property of Sweet and Spicy Monkey. Please do not reprint this content without my permission. If you wish to include this recipe on your site, please re-write in your own words and use your own photographs and link back to this post for original recipe.
Follow Julie's board Sweet and Spicy Monkey on Pinterest.

Sunday, July 5, 2015

Caramel Chocolate Buttered Popcorn


We're wrapping up Mystery week here with Dum Dum's lollipops mystery flavor, buttered popcorn. And what goes best with a buttered popcorn lollipop? Popcorn, of course!

But not just any popcorn, no Ma'am (or Sir)! But popcorn with cocoa almonds, m&m's, pieces of buttered popcorn lollipops, pretzels, and a caramel and chocolate sauce drizzled all over it.

This is not your ordinary popcorn. This is popcorn taken to a whole new level. This is a popcorn dessert!

A mixture of sweet and salty, crunchy, chocolate and ooey gooey caramel. Popcorn will never be the same after you try this.

You're welcome!

Caramel Chocolate Buttered Popcorn

Recipe by Julie Murphy
Sweet & salty, crunchy, ooey gooey caramel chocolate popcorn treat.
Prep time: 10 minutes (not including homemade caramel sauce preparation))
Cook time: 1 minutes
Total time: 11 minutes
Ingredients
  • 1 bag microwave popcorn, lightly salted
  • 3 bags (0.62 ounces) single servings cocoa roast almonds
  • 1 handful pretzel stix, broke in half
  • 1 small handful mini m&m's
  • 10 buttered popcorn Dum Dum's mystery lollipops, broken into large chunks with sticks removed
  • 1/2 cup dark chocolate melting wafers
  • 1/2 cup caramel sauce (recipe for Salted Caramel Coconut Sauce here)
Directions
  1. If making homemade caramel sauce, prepare and set aside.
  2. Prepare popcorn as directed on bag. After cooking popcorn, open bag so popcorn doesn't become soggy.
  3. You can either prepare this in the ready made popcorn bowl or pour popcorn into individual bowls or use 1 large bowl.
  4. Add pretzel sticks, m&m's, and almonds. Mix together.
  5. Prepare chocolate wafers as directed on package. Once melted, spoon or pour over popcorn mix.
  6. Drizzle warm caramel sauce over popcorn mix.
  7. Add broken chunks of buttered popcorn lollipops over the top.
  8. Serve and enjoy!

*Helpful Hints*
 
- Recipe for Salted Caramel Coconut Sauce can be found here.

Disclaimer ~ I received no monies from Spangler Candy Company for this post. I only received Dum Dum's Lollipops to use for my recipe. All opinions and recipe are my own. 

Shared with: The Wednesday Roundup #83
 
All content and images are property of Sweet and Spicy Monkey. Please do not reprint this content without my permission. If you wish to include this recipe on your site, please re-write in your own words and use your own photographs and link back to this post for original recipe.

Follow Julie's board Sweet and Spicy Monkey on Pinterest.

Tuesday, January 20, 2015

Caramel Mocha Cappuccino Fudge


Oh. Yes. I. Did. I took that A-M-A-Z-I-N-G Mocha Cappuccino Fudge recipe that I made a couple weeks ago and added ooey, gooey caramel swirled into each bite. Just when you thought it couldn't get any better....it just did!

One bite of this fudge and you'll feel like you're dining somewhere in Italy while sipping on a caramel macchiato cappuccino while watching all those Italian men walk by.


Hey, a girls gotta dream and that's what I'm dreaming of when I have this fudge {smile}.

Of course you might have your own versions of sugarplums dancing through your mind when you try this fudge but I'm willing to share mine with you too. After all, what kind of friend would I be if I didn't?

Back to this fudge, my mouth is watering as I try to come up with words to describe it to you....


creamy....buttery soft....and sweet...with a kiss of caramel and coffee.


It's like a little taste of heaven on your lips! But don't take my word for it, try it for yourself and let me know what it reminds you of.

Caramel Mocha Cappuccino Fudge

Ingredients

1 and ½ Tablespoons of instant coffee

1 Tablespoon hot water

½ cup unsalted butter, room temperature

2 cups granulated sugar

¾ cup heavy cream

1 teaspoon sea salt

1 - 12 ounce package of white chocolate chips

¼ cup semi-sweet chocolate chips

1 – 7 ounce jar marshmallow fluff

¼ cup caramels, each square quartered

1 teaspoon vanilla extract

1 candy thermometer

Sprinkle of sea salt before serving (optional)

Directions

Spray a 9” x 9” pan with nonstick spray and wipe excess off with a clean paper towel. Or you can grease the pan with butter. Set aside.

In a mug, add instant coffee and hot water and mix together until coffee is dissolved. Set aside.

In a medium saucepan, add butter, sugar, cream, and salt. Heat over medium heat, stirring continuously until butter melts and sugar dissolves.

Bring to a boil, continuing to stir, until temperature reaches 240F degrees (116C) on your candy thermometer.

After reaching 240F degrees (116C), remove pan from heat and add quartered caramels, both chocolate chips (semi-sweet and white), and marshmallow.

Continue to stir until caramel and chips are melted and marshmallow is blended. You can place on low heat to help melt the caramel, chips, and blend the marshmallow more easily. You want the caramel and chips completely melted.

Add vanilla to mixture while pan is away from the heat source.

Place about 1 to 2 cups fudge in a small bowl. Just eyeball it because the measurement doesn’t need to be exact. This is what makes the swirls in your fudge. Set aside.

Mix in the coffee with the original saucepan of fudge until it’s completely blended.

Quickly pour into prepared pan.

Place the fudge that you set aside earlier on top of coffee fudge mixture. Using a firm, thin spatula or butter knife, spread in thin swirling, circular patterns over coffee fudge, making sure not to over stir. Do this lightly over the top of the fudge.

Let cool at room temperature for at least 8 hours before cutting. You can place in refrigerator but keep in mind, it will be difficult to cut when cold.

If refrigerating, let warm to room temperature before cutting.

Best served at room temperature.

Before serving, sprinkle with a little sea salt for that Salted caramel flavor.

Can be stored in an airtight container for 2 weeks in the refrigerator.

All content and images are property of Sweet and Spicy Monkey. Please do not reprint this content without my permission. If you wish to include this recipe on your site, please re-write in your own words and use your own photographs and link back to this post for original recipe.
Follow Julie's board Sweet and Spicy Monkey on Pinterest.

 Shared with: Freedom Fridays with All My Bloggy Friends #67