Sweet and Spicy Monkey has moved to: www.sweetandspicymonkey.com

Showing posts with label peppermint. Show all posts

Wednesday, December 23, 2015

Copycat Lofthouse Sugar Cookies with Peppermint Frosting


I've been wanting to make these cookies for some time now. I prefer homemade cookies to store bought any day (you can blame my mom for that) but I love Lofthouse cookies!

So when I saw that I could make my own Lofthouse style cookies at home, after I did my happy dance, I knew I had to try them.

It's a simple recipe, but these cookies are far from simple! Big, pillowy, soft sugar cookies with lots of frosting, my kind of cookie!

Before frosting, just look how pillowy soft these cookies are!

I dressed them up for the holidays in peppermint frosting, available in pink or white, with candy cane bits sprinkled over the top.


You can find my recipe for Peppermint Cream Cheese Frosting here. For the pink frosting, add a few drops of red food coloring. Or you can use beet powder or beet juice to desired color. I used about 1 teaspoon of beet powder to give my frosting its pink coloring.


Santa will definitely be looking for these cookies when he stops by your house to deliver presents on Christmas Eve.

Just be sure to leave him a big glass of milk to go with them.

Wishing y'all a very, Merry Christmas!

Lofthouse Style Sugar Cookies

Recipe by Julie Murphy
Big, soft sugar cookies made Lofthouse style with a peppermint frosting.
Prep time: 15 minutes
Cook time: 10-12 minutes
Total time: 40 minutes (does not include chilling time)
Yield: 2 dozen cookies
Ingredients
  • 1 cup granulated sugar
  • 1/2 cup (1 stick) unsalted butter, room temperature
  • 2 eggs
  • 1/2 cup plain Greek yogurt
  • 2 teaspoons vanilla extract
  • 3 cups All-purpose flour
  • 1 and 1/2 teaspoons baking powder
  • 1/2 teaspoon baking soda
  • 1/2 teaspoon sea salt
Cooking Directions
  1. In a large mixing bowl, sift together flour, baking powder, baking soda, and salt. Set aside.
  2. In a separate large mixing bowl, cream together butter and sugar.
  3. Beat in eggs with butter mixture.
  4. Add in yogurt and vanilla, mixing well.
  5. Gradually add in dry ingredients, mixing all ingredients together well.
  6. Remove dough from bowl, wrap in plastic wrap, and refrigerate overnight.
  7. After dough has chilled overnight and when you're ready to bake the cookies, preheat oven to 350F degrees.
  8. Line cookie sheets with parchment paper. Set aside.
  9. Remove dough from refrigerator and let sit for 5 minutes. This makes it easier to work with the dough.
  10. On a dry, flat surface, sprinkle flour and spread it around the surface using your hands. Place dough on floured surface and roll dough out. Sprinkling flour as needed under the dough, on top of dough, and on rolling pin to help prevent dough from sticking to surface.
  11. Roll out to desired thickness. Remember, Lofthouse cookies are thicker than normal cookies and will rise a little bit.
  12. Using a round cookie cutter or the rim of a glass, make circle cuts in dough to make cookies. Place on prepared cookie sheets, leaving cookies 2" apart.
  13. Bake for 10 to 12 minutes, or until cookies are firm to the touch. They may appear under baked. You DON'T want cookies to brown.
  14. Remove from oven and let cool on cookie sheet for 5 to 10 minutes before transferring cookies to a wire rack, where they can cool completely.
  15. Repeat with rest of dough, rolling out dough, making circles, and baking until all dough is used up.
  16. After cookies have cooled completely, about 2 hours, its time to frost them.
  17. Apply frosting generously with a butter knife and sprinkle candy cane bits over the tops. Place back on wire rack and let sit for about 10 minutes before covering with plastic wrap or aluminum foil.
  18. Serve with a tall glass of milk.

*Helpful Hints*

- I refrigerated my dough overnight. Some recipes for Lofthouse style cookies say you can cook immediately, some say to refrigerate for a few hours. I was happy with the results after chilling the dough overnight. I cannot guarantee that your cookies will turn out like mine if you do not chill the dough overnight.

- You need to roll out the dough and use a cookie cutter or rim of a glass to cut cookies. Otherwise you will get a round, ball shaped cookie with rough edges not resembling anything close to a Lofthouse cookie.

- If you're rushed for time, you can use store bought frosting and flavor with 1 to 2 teaspoons of peppermint extract.

Inspired by ~ Ashley at Center Cut Cook.

All content and images are property of Sweet and Spicy Monkey. Please do not reprint this content without my permission. If you wish to include this recipe on your site, please re-write in your own words and use your own photographs and link back to this post for original recipe.

Saturday, December 19, 2015

Peppermint Chocolate Cake Pops


I never thought in my wildest dreams that I would be sharing a cake pop recipe with you.

Mainly because I thought they were trendy and I try to stay away from trends. I like marching to my own drummer. A little bit of a rebel, perhaps, but definitely not a trend follower. But sometimes trends are not trends, but ideas that turn out to be game changers, like cake pops.

With my second attempt on Swiss Cake Rolls failing...again, there I was, with another cake recipe I could not share with y'all. I had to find a way to make use of it or it would somehow disappear.

My hips and waistline were begging me No, not again!


And since I had already shared a trifle recipe with you from the first Swiss Cake Roll fail, I had to think of another recipe, so Cake Pops it was. And not just plain cake pops, but Peppermint Chocolate Cake Pops decorated with candy cane bits for the Christmas holiday.

I am so happy I finally made cake pops because:

  1. they are just so darn cute
  2. they're easy and fun to make
  3. they're portion controlled (Hello, diet) and
  4. they are so yummy!
They're like a little taste of Christmas in a single bite with their chocolate peppermint middle and peppermint candy sprinkles.

You can make cake pops for any occasion since you can decorate them any way you want which is half the fun of making them!

I would suggest watching Bakerela's video on YouTube before making these if this is your first time because she is the person behind cake pops and she has some great tips on making them. There's also other food bloggers out there who have picked up a few good tips for making cake pops too.

A great time to do this is while your cake is cooling off or while your chilling the cake balls before dipping.

Now I used red and white candy melts separately for dipping and I also combined them for a pink peppermint color. You can experiment with what you like as your imagination is the limits.


If you’re lucky, I just might mess up another Swiss Cake Roll on purpose because I'm really liking loving these recipes that are coming out of my mistakes. And I hope you do too!

If you make these Peppermint Chocolate Cake Pops, tag me on your social media channels so I can see how yours turned out.

Happy Cake Pop Making!

Peppermint Chocolate Cake Pops
Peppermint Cake Pops are prefect for the Christmas Holidays!
Total time: 2 hours
Yield: Makes about 3 dozen cake pops

Ingredients

  • 1 box Devil's food cake mix, any brand + ingredients needed to make
  • 1/2 cup peppermint crunch baking chips
  • 1/2 cup (1 stick) unsalted butter, room temperature
  • 1-8 ounce package cream cheese, room temperature
  • 3-4 cups powdered sugar
  • 1-2 teaspoons peppermint extract
  • 1 cup peppermint candy bits
  • 1- 12 ounce package white candy melts
  • 1- 12 ounce package red candy melts
  • 1 package Lollipop sticks
  • 1 Styrofoam lid or block, or cake pop stand

Cooking Directions

  1. Prepare cake mix as directed on box. Fold in 1/2 cup peppermint crunch baking chips. Bake as directed on box. Remove from oven when done and let cool to room temperature.
  2. To make peppermint cream cheese frosting: Cream together butter, cream cheese, and peppermint extract.
  3. Slowly add in powdered sugar, 1 cup at a time, starting with a low speed and gradually increasing speed so sugar doesn't fly out of the bowl. You can always add in more powdered sugar, 1 Tablespoon at a time, if you prefer your frosting sweeter.
  4. Once cake has cooled, crumble into a large mixing bowl.
  5. Stir in 1/3 cup of peppermint frosting. You can use a wooden spoon, a fork, or your hands to mix the frosting with the cake crumbs.
  6. Add in more frosting, 1 Tablespoon at a time, until you get an even mixture of cake and frosting. You want just enough frosting so the cake crumbs will stick together when rolled into a ball without looking clumpy or falling apart. On the other side, you don't want the cake mixture too wet or mushy.
  7. Using a cookie scoop, scoop cake mix and roll together between your palms into a ball shape. Place on cookie sheet lined with wax paper. Repeat process until all mixture is shaped into balls.
  8. Cover with plastic wrap, place in refrigerator and let balls chill for 1 hour or overnight.
  9. *Do not place cake balls in freezer before dipping or it may cause the chocolate to crack after dipping.*
  10. After balls have chilled, its now time to prepare them for dipping. Melt candy melts as directed on package. Dip the tip of lollipop stick into the melted candy melts and insert into the flat side of the cake balls (the side they have been resting on), inserting a little less than halfway.
  11. Place cake balls with sticks back in refrigerator and let chill for 15 minutes.
  12. After lollipop sticks have had a chance to set, its now time to dip. You may need to heat up candy melts again in microwave to soften them before dipping. Let sit for 15 seconds before dipping cake balls.
  13. Grab cake ball by the lollipop stick and dip into the candy melts until entire cake ball is covered and remove. Do not twirl, turn, or swirl cake ball in candy melts because this may cause the cake ball to fall apart and leave crumbs in dipping candy. Just dunk straight into melted candy and out. If you need to cover a bare spot, use a spoon to pour melted candy over the spot. You can use a clean toothpick to lightly wipe any excess melted candy off of the lollipop stick.
  14. After cake ball has been dipped, slowly rotate until excess chocolate has dripped off.
  15. Decorate right away by holding cake pop over a small bowl and sprinkling with peppermint candy bits.
  16. Place decorated cake pop into a Styrofoam lid or block, or a cake pop stand and let cool.
  17. Serve immediately or store in freezer in a zip lock bag.
  18. If freezing, let cake pops sit out for about 10 minutes before eating.

Inspired by ~ Angie from Bakerella.

All content and images are property of Sweet and Spicy Monkey. Please do not reprint this content without my permission. If you wish to include this recipe on your site, please re-write in your own words and use your own photographs and link back to this post for original recipe.

Thursday, December 10, 2015

Red Velvet Peppermint Trifles


Really this recipe should be called Red Velvet Swiss Cake Roll fail made into trifles or what to do when your Red Velvet Swiss Cake Roll doesn't quite turn out like....can't even distinguish what it is.... what the (insert expletive) is that....doesn't look anything similar to the photo from the recipe you used.

But I thought the Red Velvet Peppermint Trifles sound so much prettier, don't you agree? Not to mention they look a whole lot prettier than my Swiss Cake Roll fail!

My Swiss Roll Cake Fail!

I'm trying to keep positive and show you the other side of baking, which is what to do when things don't always turn out like you want.

Just like that old adage, "when life gives you lemons, make lemonade." I kind of did the same thing here by turning my fail into a delicious dessert that I can still share with you!

Here I used tall shot glasses for the photos, but you can serve them in anything you want from a glass pudding cup, a glass coffee cup, champagne or wine glasses, or mix it up and use them all!


Not only are these Red Velvet Peppermint Trifles festive with their red and white coloring but they taste just like Christmas should. The luscious cream cheese frosting, the chocolate cake, and the peppermint flavors from whipped cream and peppermint sprinkles....YUM!

It almost makes me want to mess up the next Swiss Cake Roll for some more of this! Not like I would ever do that on purpose. No!

Never!

Not me!


Well, maybe {smile}.

Red Velvet Peppermint Trifles

Recipe by Julie Murphy
Red Velvet cake, cream cheese frosting, and peppermint whipped cream come together in this Holiday dessert trifle.
Prep time: 20 minutes
Cook time: 30 minutes (for cake)
Total time: 50 minutes
Ingredients
  • 1 Red Velvet Cake Mix, plus ingredients for making
  • 1 cup (2 sticks) unsalted butter, softened
  • 2-8 ounce packages cream cheese, room temperature
  • 1 and 1/2 teaspoons vanilla extract
  • 6 and 1/2 cups powdered sugar (for frosting)
  • 2 cups heavy cream
  • 2 cups powdered sugar (for peppermint whipped cream)
  • 2 teaspoons peppermint extract
  • 1 -10 ounce bag peppermint crunch baking chips
Cooking Directions
  1. Preheat oven to temperature noted on box of cake mix.
  2. Spray one sheet cake pan or 9" x 15" cookie sheet with non-stick cooking spray & line with parchment paper. Set aside
  3. Prepare cake mix as directed on box. Bake and remove from oven. Let cool before frosting.
  4. To prepare cream cheese frosting:
  5. Cream together butter, cream cheese, and vanilla in a large mixing bowl.
  6. Gradually add in powdered sugar 1 cup at a time, starting with a low speed and gradually increasing speed so sugar doesn't fly out of the bowl. (Not like that happened to me!)
  7. If you prefer a sweeter frosting, you can gradually add in more powdered sugar to taste.
  8. Spoon into an airtight container and let chill in the refrigerator while cake cools.
  9. To make Peppermint Whipped Cream:
  10. Using a whip attachment, whip together heavy cream, peppermint extract, and powdered sugar in a large mixing bowl until stiff peaks appear, approximately 5 minutes.
  11. Once you get desired thickness of whipped cream, spoon into an airtight container and chill in refrigerator.
  12. Once cake has cooled (at least 2 hours), frost with cream cheese frosting.
  13. To assemble trifles:
  14. Take a spoonful of frosted cake and place into bottom of dish, add a dollop of peppermint whipped cream over cake, sprinkle with peppermint crunch baking chips, repeat to fill dish, topping with peppermint whipped cream and a sprinkling of peppermint crunch baking chips.
  15. Serve immediately or chill until time to serve.

All content and images are property of Sweet and Spicy Monkey. Please do not reprint this content without my permission. If you wish to include this recipe on your site, please re-write in your own words and use your own photographs and link back to this post for original recipe.
Follow Julie's board Sweet and Spicy Monkey on Pinterest.

Sunday, December 21, 2014

Chocolate Peppermint Cookies


I get the exhilarating feeling of a cool wind rushing by my face as I ski down the snowy slopes of the Swiss Alps on a cold, winter morning.

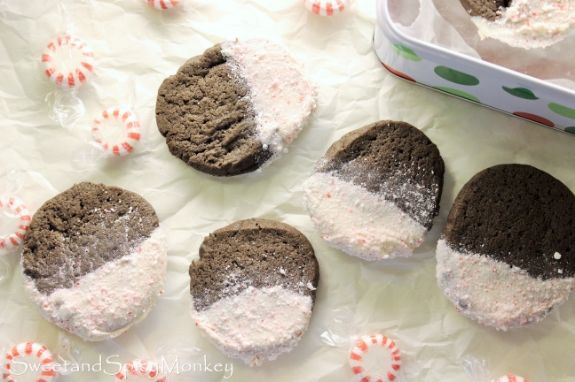
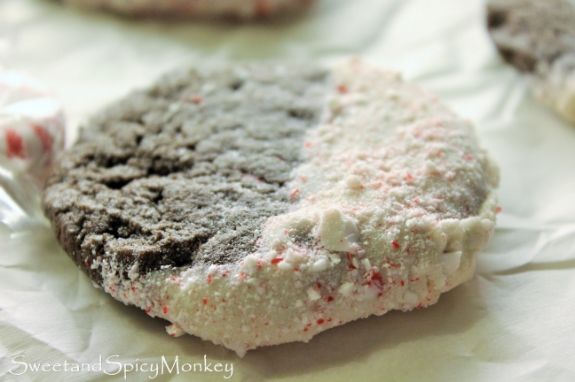
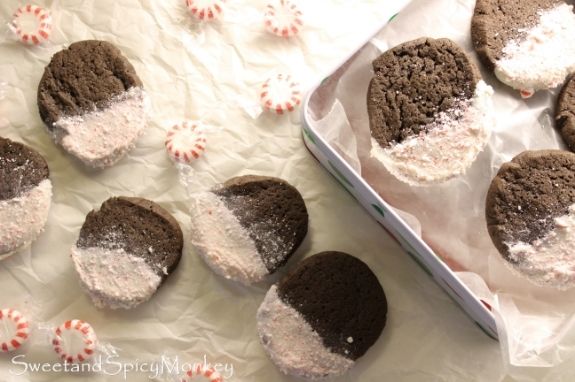
Remember those ads from York Peppermint Patties? Well, that is the exact feeling you get when you bite into one of these Chocolate Peppermint cookies, a cool, minty flavor paired with a chocolate cookie....Mmmmm!


My first intention when making these was to add peppermint extract to the white chocolate and cover with the crushed peppermint candies. But after taking a bite of the first cookie, I realized I didn't need to add the peppermint extract. I was surprised, and pleased, with how much flavor the crushed peppermint candies brought to the cookie. It was a win-win {smile}.


See, there is an advantage to having a food blog as you get to taste test the food before the recipe goes to print!

Chocolate Peppermint Cookies

Makes 4 dozen cookies

Ingredients

1 and ¼ cup (2 and ½ sticks) unsalted butter, room temperature

2 cups granulated sugar

2 large eggs

1 Tablespoon vanilla extract (that's not a typo)

½ cup cocoa powder

¼ cup Dark cocoa powder

2 cups all-purpose flour

1 teaspoon baking soda

1 Tablespoon corn starch

¼ teaspoon sea salt

Directions

In a medium bowl, add both cocoa powders, flour, baking soda, corn starch, and salt. Set aside.

In a large mixing bowl, blend together butter and sugar until creamy.

Add eggs and vanilla to butter mix.

Slowly add dry ingredients to butter & sugar mix until all ingredients are mixed completely.

Place 2 sheets of waxed paper on the counter.

Place 1/2 of cookie dough onto one sheet of wax paper and gently roll the dough with your hands into a long roll, like a tootsie roll shape, about 2 inches high and 12 inches long. Or you can make the cookies as large or small as you like here. Once you get your shape, roll up into the wax paper and refrigerate for at least 3 hours, or you can freeze to make at a later date.

Repeat with other 1/2 dough mix.

Preheat oven to 350F degrees.

Remove cookie roll from refrigerator, unroll wax paper, cut into 1/4 to 1/2 inch slices and place on parchment paper about 3 inches apart, as cookies will spread.

Bake for 10-12 minutes.

Remove cookie sheet from oven and let sit for 3-5 minutes before placing on a wire rack to let cool completely before dipping in white chocolate.

Ingredients for dipping

2 cup white chocolate chips

1 Tablespoon shortening (helps thin the white chocolate so it doesn't go on so thick)

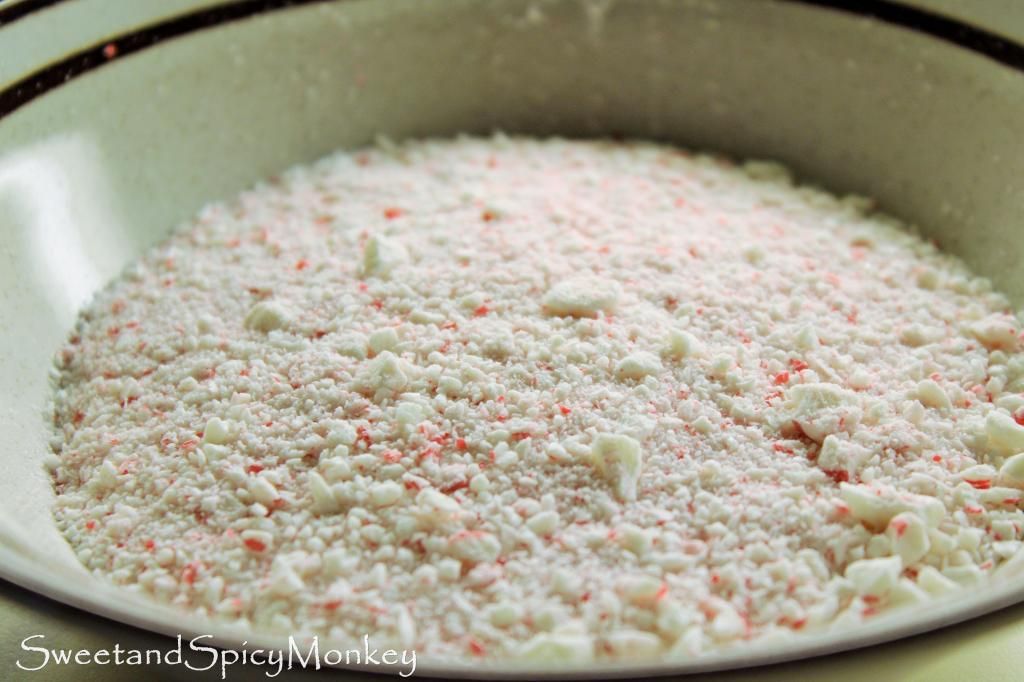
1 cup crushed peppermint candy like in the photo below. (I used my Ninja blender for making these and it worked great, not even sticking inside the blender).


Directions for making white chocolate dip and decorating cookies

Pour chips and shortening into a microwave proof bowl. Place in a microwave on defrost or low temperature to melt chips.

Stir every 15-30 seconds until chips are melted. Just remember they will maintain their shape until stirred and you do not want to burn them.

Once your white chocolate is completely melted, dip cookie in white chocolate. You can be the judge here of how much you want covered in white chocolate, play around and see what you like best.

After you dip cookies, spoon crushed peppermint candies over the white chocolate and place on wax paper to cool.

After cookies have cooled off and dried, store in an airtight container for up to 1 week.

If you live in a hot climate, store in refrigerator so the white chocolate does not melt.


All content and images are property of Sweet and Spicy Monkey. Please do not reprint this content without my permission. If you wish to include this recipe on your site, please re-write in your own words and use your own photographs and link back to this post for original recipe.
Follow Julie's board Sweet and Spicy Monkey on Pinterest.

Shared with: Foodie Friends Friday Linky Party #127, Inspire Us Thursday Link Party #80