Sweet and Spicy Monkey has moved to: www.sweetandspicymonkey.com

Showing posts with label Valentine's day. Show all posts

Friday, February 12, 2016

Double Chocolate Scones with Mocha Cream Cheese Filling


Today, I'm sharing a recipe for Double Chocolate Scones with Mocha Cream Cheese filling. A not so healthy recipe, but an oh so yummy one!

You might say, this is my Valentine’s Day recipe, but these scones are good any day of the year!

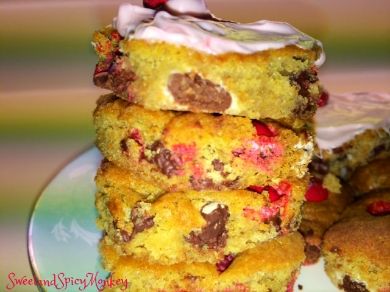
Chocolate cake-like scones with chocolate chips in every bite and a light, creamy mocha filling with a dollop of whipped cream.

Are you drooling yet?

I love scones because they're so easy to make and you can't mess them up. You can whip up this recipe in about 30 minutes.

They're amazingly delicious with the filling, but you can also serve them warm with only butter or cream cheese. And they're also yummy warmed up with no topping. Yes, they're just simply delicious!


These scones make the perfect breakfast for Valentine's Day since everyone loves chocolate. And what better way to start your day than with a little taste of chocolate, coffee, and cream!

Happy Valentine's Day!


Double Chocolate Scones with Mocha Cream Cheese Filling

Recipe by Julie Murphy @ Sweet and Spicy Monkey
Double chocolate scones are delicious with a Mocha cream cheese filling, whipped cream, both, or just by themselves anytime of the day.
Prep time: 15 minutes
Cook time: 15 to 18 minutes
Total time: 32 minutes
Yield: 10 to 12 scones
Ingredients
  • 3/4 cup + 3 Tablespoons full-fat coconut milk (canned)
  • 1 large egg
  • 1 Tablespoon chocolate extract
  • 1 teaspoon vanilla extract
  • 2 cups All-purpose flour
  • 1/2 cup unsweetened cocoa powder
  • 1/2 cup granulated sugar
  • 1 Tablespoon baking powder
  • 1/4 teaspoon sea salt
  • 6 Tablespoons cold coconut oil
  • 1 cup semi-sweet chocolate chips
Cooking Directions
  1. Preheat oven to 425F degrees.
  2. Line 2 cookie sheets with parchment paper or use a silicone baking sheet. Set aside.
  3. Remove coconut oil from refrigerator or freezer so it can soften. Set aside.
  4. In a small bowl, add egg, coconut milk, chocolate extract, and vanilla. Set aside.
  5. In a large mixing bowl, gently whisk together flour, cocoa powder, sugar, baking powder, and salt until mixed.
  6. Add in softened coconut oil, mixing for about 1 to 2 minutes.
  7. Pour in coconut milk mixture until dough comes together. If dough is too wet, add a little flour at a time. If dough is too dry, add in coconut milk, 1 Tablespoon at a time.
  8. Fold in chocolate chips.
  9. Sprinkle flour lightly on a flat, dry surface.
  10. Remove dough from bowl and work with your hands for about 1 minute.
  11. Roll dough out until about 1" thickness.
  12. Using biscuit cutters, cut dough into round shapes and place onto prepared cookie sheet, leaving about 2" between dough shapes.
  13. Place into oven and bake for 15 to 18 minutes.
  14. Remove from oven and let cool on cookie sheet before transferring onto a wire rack where scones can cool completely.
  15. Repeat with remaining dough.


Mocha Cream Cheese Filling

Recipe by Julie Murphy @ Sweet and Spicy Monkey
A light, cream cheese filling with a delicious coffee flavoring for scones, French toast, cakes, or cupcakes.
Prep time: 5 minutes
Total time: 5 minutes
Yield: 8 ounces
Ingredients
  • 1/2 cup cream cheese
  • 1/2 cup + 5 Tablespoons powdered sugar
  • 1/2 teaspoon vanilla extract
  • 1 packet (1.30 ounces) Starbuck's via instant Latte cafe mocha
  • 17 to 20 drops red food coloring (optional)
  • 1 cup heavy cream
Directions
  1. In a large mixing bowl, beat together cream cheese, powdered sugar, vanilla, café mocha granules, and red food coloring until creamy and fluffy.
  2. Changing to whipping attachment, whip in heavy cream until peaks form.
  3. To place in scones, cut scone in half (top and bottom) and scoop filling onto each scone half. Place a dollop of whipped cream over the filling. Serve.
  4. To store filling: Scoop into an airtight container and store in refrigerator for up to 1 week.

Inspired by ~ Red Velvet Scones.


All content and images are property of Sweet and Spicy Monkey. Please do not reprint this content without my permission. If you wish to include this recipe on your site, please re-write in your own words and use your own photographs and link back to this post for original recipe.

Saturday, January 31, 2015

White Chocolate Cherry Oreo Fudge


Remember when you were a kid and your mom always told you "it's better with a cherry on top". Well I don't know about you, but if it's better with a cherry on top, then it's even better with cherries all over, inside and on top.

Lately here, I've been craving the sweet taste of cherries. Maybe it's because Valentine’s Day is coming up and cherries just seem like the go to food since they're red. Or maybe it's because I haven't dabbled much with cherries in the kitchen and there are so many foods I want to make right now with cherries.


I think cherries are my new lemon this year! Pppffff, you're right, who am I fooling? Nothing can replace my delicious, citrusy lemon! Nuthin'!

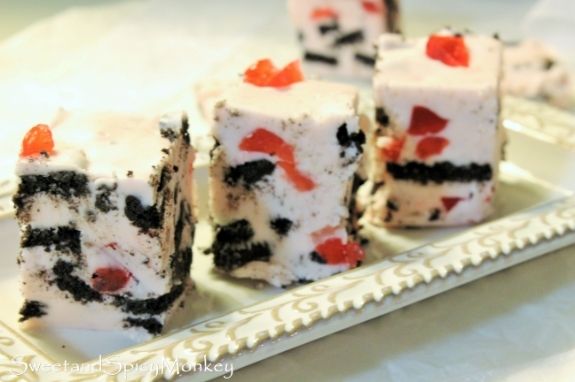
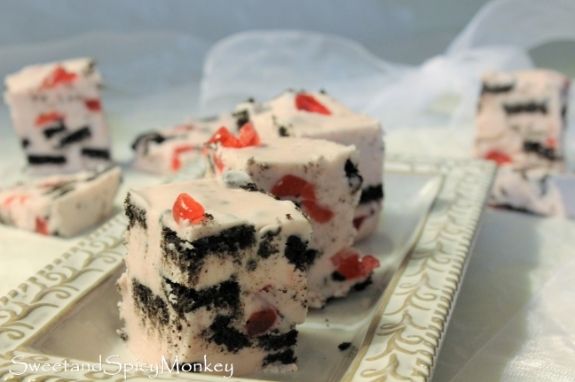
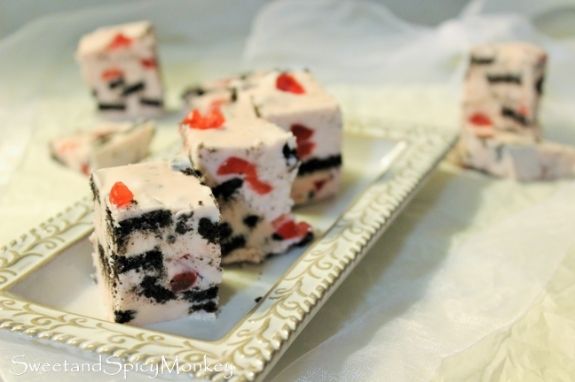
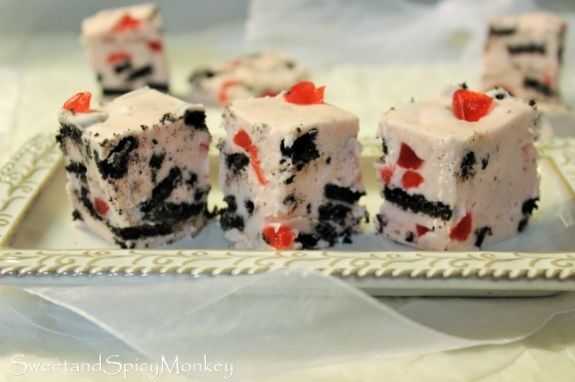
Yes, another fudge recipe because you can never have enough fudge in your life {smile}. I've made this delicious fudge with cherries and Oreos. A beautiful pink fudge with pieces of Oreos and candied cherries that is reminiscent of a cherry chocolate cake but in bite size squares.


Sure to win your heart after just one bite!

White Chocolate Cherry Oreo Fudge

Ingredients

½ cup unsalted butter, room temperature

2 cups granulated sugar

¾ cup heavy cream

1 teaspoon sea salt

1 - 12 ounce package of white chocolate chips

1 – 7 ounce jar marshmallow fluff

½ teaspoon vanilla extract

½ teaspoon cherry extract

½ cup candied cherries, quartered

2 cups Oreos, crumbled

Few drops of Red food coloring

1 candy thermometer


Directions

Spray a 9” x 9” pan with nonstick spray and wipe excess off with a clean paper towel. Or you can grease the pan with butter. Set aside.

In a medium saucepan, add butter, sugar, cream, and salt. Heat over medium heat, stirring continuously until butter melts and sugar dissolves.

Bring to a boil, continuing to stir, until temperature reaches 240F degrees on your candy thermometer.

After reaching 240F degrees, remove pan from heat and add white chocolate chips and marshmallow. Continue to stir until all chips are melted and marshmallow is blended. You can place on low heat to help melt all the chips and blend the marshmallow.

Add vanilla and cherry extract to mixture while pan is away from the heat source. Place a couple drops of red food coloring in at this time until you get desired color. 2-3 drops and fudge will be a beautiful pink color. More drops of food coloring, fudge will become more red than pink, so use sparingly.

Mix in candied cherries and Oreos, blending well throughout mixture. You will need to put some muscle behind the stirring at this time.

Quickly pour into prepared pan.

Let cool at room temperature for at least 8 hours before cutting. You can place in refrigerator but keep in mind, it will be difficult to cut when cold. If refrigerating, let warm to room temperature before cutting.

Best served at room temperature.

Can be stored in an airtight container for 2 weeks in the refrigerator.

All content and images are property of Sweet and Spicy Monkey. Please do not reprint this content without my permission. If you wish to include this recipe on your site, please re-write in your own words and use your own photographs and link back to this post for original recipe.
Follow Julie's board Sweet and Spicy Monkey on Pinterest.

Shared with: Foodie Friends Friday Linky Party #133, Sweet and Savoury Sunday #99, Freedom Fridays with All My Bloggy Friends #67

Wednesday, February 12, 2014

Chocolate Chip Heart-shaped pan cookies

Sweet and Spicy Monkey has a new look! I’m changing a few things around here, trying to incorporate a Pinterest button if I can ever figure that out! Hopefully will have one soon so y’all can follow me on Pinterest too! Being stuck indoors for the last few days, I had to find something creative to do and now it’s snowing here in Georgia! So there might be some more changes {smile}.

Usually we don’t get that much snow in Georgia, maybe about 1"-2” for the year, if that, but these last couple days it has done nothing but snow. Right now where I live, we have about 4” of snow and it’s predicted to become about 6"-9” of snow over the next two days! Luckily, I live nowhere near Atlanta so no worries about snow jam here, but I did walk out to my street this morning and this is what I saw…


Here's my pups enjoying the snow!


Yep, looks like I’m stuck inside for the next 2 days or so until the sun comes back out and melts this snow and ice away.

In the meantime, I decided to bake some more Valentine Cookies! After all, it’s only a couple days away now, two to be exact! Thankfully, I made my stop at the grocery store earlier this week and stocked up on my baking supplies (lucky for you, {smile}).


For this recipe, I used the Nestle’ Toll House pan cookie recipe variation and added my M&M Valentine Red Velvet candies. After baking them and while they were still warm, I took my heart cookie cutter and made heart shaped cookies. If you like, you can also frost them. There you have it, very easy to make, heart shaped Valentine cookies that everyone will love!


Chocolate Chip Heart-shaped pan cookies

Ingredients

2 and ¼ cups all-purpose flour

1 teaspoon baking soda

1 teaspoon salt

2 Tablespoons corn starch (for fluffiness)

1 cup butter (2 sticks), softened to room temperature

¾ cup granulated sugar

¾ cup brown sugar

1 teaspoon vanilla

2 large eggs

1 cup semi-sweet chocolate chips

1 cup M&M’s Red Velvet, milk chocolate candies


Directions

Preheat oven to 375F.

Spray a 15” x 10” cookie sheet with non-stick spray and set aside.

In a medium mixing bowl, combine flour, baking soda, salt, and corn starch. Set Aside.

In a large mixing bowl combine granulated sugar, brown sugar, and vanilla, blending until creamy.

Add eggs into sugar mixture and blend thoroughly.

Slowly add in the flour mix, blending until mixture becomes doughy.

Stir in chocolate chips and M&M candies, mixing throughout dough.

Plop dough onto prepared cookie sheet and spread with hands, using your fingers to fill cookie sheet with dough. *Its ok if you don’t get all the corners filled, the dough will expand and should fill in as it bakes.*

Bake for 20-25 minutes or until golden brown. Keep a watchful eye on it as it bakes, as the corners usually bake quicker.

Remove from oven and let cool for 1 minute.

Simply place cookie cutter over warm, baked pan cookie and make heart shaped cookies, wiggling cutter to ensure cut, leaving heart shaped cookies on the pan until thoroughly cooled.


Once cooled, use a spatula to remove cookies from cookie sheet to a wire rack.

Decorate with frosting. *Optional*

*Prep time - 40 minutes
*Makes about 28 heart-shaped cookies
*Store in an air-tight container for up to 1 week.

Here's to a sweet Valentine's Day to you! Xoxo


All content and images are property of Sweet and Spicy Monkey. Please do not reprint this content without my permission. If you wish to include this recipe on your site, please re-write in your own words and use your own photographs. Or you can link back to this post for the recipe.

Sunday, February 9, 2014

Easy Valentine Cupcakes


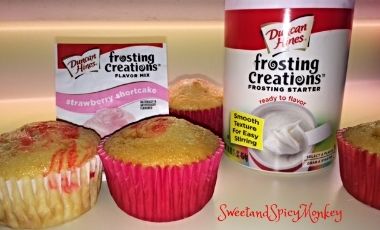
As I was walking through the aisle where the baking items are sold at my local store the other day, something caught my eye. I noticed Duncan Hines had something called Frosting Creations, where you buy a “frosting starter” and a “flavor mix” which came in a wide variety of flavors not normally seen in the frosting section. I have to say I was curious as to what this was all about so I bought a frosting starter and a couple of the flavor mixes, one in Black Cherry and the other in Strawberry Shortcake.


With Valentine’s Day coming up this week, I figured this would be a good time to try these out and see how they do. This was going to be an easy peasy recipe for cupcakes since it was all store bought instead of homemade.

I'm not including the directions with these since it's all there on the back of the box. Prep time for baking the cupcakes is 15-20 minutes and then allow for time to cool thoroughly before frosting. I baked my cupcakes the day before to ensure they would be cooled before frosting because if you frost while cupcakes are still warm, the frosting is difficult to apply because it keeps wanting to melt right off. You can always bake them in the morning before work and frost them when you get home, whatever works best for you to allow the cupcakes to cool thoroughly before frosting.

For the cupcake mix, I bought a white cake mix and prepared as directed. After I poured the mix into the cupcake cups, I put one drop of red food coloring in each cup mix and swirled it with a toothpick to get the red effect on the inside of the cake and baked as directed on the box and let cool.


For the frosting, I made as directed making a deep hole in the frosting starter and pouring in the black cherry flavor mix and blending well, making sure all the flavor mix was blended with the frosting. Once blended, the frosting came out as a dark pink, almost purple in color, with a light cherry taste.


Since I made 22 cupcakes, I quickly used up the black cherry frosting before all my cupcakes were frosted. Which was no problem because I had some white vanilla whipped frosting on hand and compared the ingredients of the frosting starter to that of the white vanilla frosting and realized they were basically the same thing. Luckily I had also bought the strawberry shortcake flavor mix, so I added it to the white frosting and ended up with a light pink creamy frosting with a touch of strawberry flavor.

I was impressed with how easy it was to make the signature flavor frostings and how different the coloring was than your normal over the shelf frostings of white, pink, and dark brown colors. Nowadays, you have flavors like cotton candy, white chocolate raspberry, pink lemonade, orange cream, pumpkin spice, and apple spice frosting to name just a few. Plus the colors come in a wide variety not normally seen on cupcakes and cakes such as green, blue, orange, and yellow. Frosting is not the same as when I was growing up! All we had was vanilla, strawberry, and chocolate frosting. Which is why baking is much more fun now with all the creative colors and flavor combinations!

Since these were going to be my Valentine’s Day cupcakes, I topped each one with a Hershey’s chocolate heart wrapped in pretty pink foil.


I call these my Easy Valentine Cupcakes for those of you who don’t have much time to make cupcakes but still want something that is low in cost, simple to make, looks pretty (with all the different colors), and tastes like you spent all day making them. Plus it gave me the opportunity to try out the frosting creations and let you know how they are. Let me know which flavors you try and how they turn out.

Here’s to wishing y’all a Happy Valentine’s Day!


All content and images are property of Sweet and Spicy Monkey. Please do not reprint this content without my permission. If you wish to include this recipe on your site, please re-write in your own words and use your own photographs. Or you can link back to this post for the recipe.