Sweet and Spicy Monkey has moved to: www.sweetandspicymonkey.com

Showing posts with label Sweets. Show all posts

Wednesday, February 17, 2016

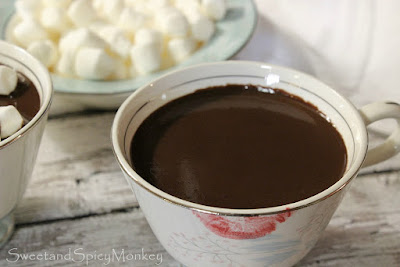
French Hot Chocolate


Have you ever had one of those days where you get this intense, crazy craving for something? I had one of those days earlier this week, where I could not get my fill of chocolate.

Funny thing, chocolate is the only thing that gives me these crazy, intense cravings. One bite, and I can't get enough of this dark, luscious treat.

Lucky for me (and my waistline), I've finally found a match for my chocolate cravings in this French Hot Chocolate.


French hot chocolate, also known as Chocolat Chaud, is a rich and silky smooth Parisian style hot chocolate.

This is not the hot chocolate from your childhood or for those of you who dabble with milk chocolate.

Nope, this is for the true chocolate lover, the one who loves dark chocolate, the one who has chocolate treats in her purse, the one who can eat chocolate cake with chocolate frosting and not think it’s too rich of a combination.

This hot chocolate is for the truest of true chocolate lovers.


This hot chocolate is thick and decadent, yet oh so silky smooth with a rich chocolate flavor and a hint of sweetness.

Not for the faint of heart who dislike creamy, chocolatey drinks. This hot chocolate is sure to put a stop to all your chocolate cravings and keep you warm on cold days.

Or maybe just anytime you're craving a silky smooth cup of hot chocolate.

You can also add a splash of espresso or Starbucks instant coffee granules for a different twist to it. Or maybe a sprinkling of cinnamon or pinch of cayenne to intensify the chocolate flavors.

You can drink it plain or top with marshmallows or fresh whipped cream.

However you choose to drink this hot chocolate, it will become your new cuddle up drink under a big fluffy blanket.


You're welcome!


French Hot Chocolate

Recipe by Julie Murphy @ Sweet and Spicy Monkey
A rich and silky smooth cup of Parisian-style hot chocolate.
Prep time: 5 minutes
Cook time: 5 minutes
Total time: 10 minutes
Yield: 1 large cup or 2 small cups (dematisse)
Ingredients
  • 1 cup cashew milk (unsweetened vanilla)
  • 1 and 1/2 Tablespoons unsweetened cocoa powder
  • 2 Tablespoons honey
  • 5 to 8 squares bittersweet chocolate, small pieces or shavings
  • 1/4 teaspoon vanilla extract
  • marshmallows or fresh whipped cream for topping
Cooking Directions
  1. In a small saucepan, add cashew milk and cocoa powder. Whisk together vigorously until powder is mixed with milk. The cocoa powder will start off on top of the milk and with vigorous whisking, it will start mixing in with it. This takes about 3 to 5 minutes.
  2. Stirring with a wooden spoon over low to medium heat, add in honey and chocolate shavings. Continue to stir until chocolate is completely melted. If milk starts to boil, turn heat down and continue stirring. If you prefer a thicker hot chocolate, you can let it boil for about 2 minutes, stirring constantly so it doesn't burn.
  3. Remove from heat and stir in vanilla.
  4. Pour into cup and top with marshmallows or fresh whipped cream.

*Helpful Hints*

- If possible, make this hot chocolate ahead of time, allowing it to sit and cool down. Rewarm and serve immediately. As the flavors improve over time.

All content and images are property of Sweet and Spicy Monkey. Please do not reprint this content without my permission. If you wish to include this recipe on your site, please re-write in your own words and use your own photographs and link back to this post for original recipe.
Follow Julie's board Sweet and Spicy Monkey on Pinterest.

Tuesday, February 2, 2016

Scottish Shortbread Cookies


Have you ever just got back from the store after buying all the ingredients for something you had planned for weeks to make, only to discover you bought salted butter instead of unsalted butter? Yep, that happened to me the other day.

I have been eyeballing this recipe for so long now and when I went to make it (finally), when I discovered that I bought salted butter instead of unsalted butter. Funny thing is, I never, let me clear that up, N-E-V-E-R buy salted butter.

Yes, I was wearing my glasses at the time too. I knew you were about to ask that!

How something so bizarre could ever happen, I can only figure I was so excited to be buying the European butter that I accidentally grabbed the salted butter. Oops!

Butter failure.

Ha, that's what I initially thought too! But instead I decided to give it a go with the salted butter and see how it turned out. A baking experiment of sorts, you could say, for inquiring minds. Because I'm sure there's a lot of you out there, besides myself, who have wondered "can I use salted butter instead of unsalted butter in this recipe?".

The answer for me was yes.


Since the recipe called for 1/2 teaspoon of salt, I used the salted butter and added two pinches of salt to make up the difference, which was pure luck in my case.

Recently, Food52 did a post on using salted for unsalted butter in recipes and they actually did the math, (yes, actual math equations) to figure out the amount of salt to use when substituting salted for unsalted butter in recipes. Crazy, right?!?

If you want to do the math, check out Food52's post on the use of salted for unsalted butter or vice versa in recipes here.

Like I said, I just winged it and it worked out fine as my shortbread cookies did not turn out mushy or pasty.

Now I would not recommend using regular butter over European butter because I could just tell by the feel of the European butter how much creamier it is than regular butter. Just think of comparing itchy wool to plush velvet, no comparison at all.

That's the comparison between regular butter and European butter, no comparison.

These cookies are amazing as you can smell the butter in them. And that buttery, melt in your mouth cookie pushes them over the edge. Of course you can always drizzle chocolate or caramel over the top, if that's what you fancy.

But for me, I love them exactly how they are, buttery, melt in your mouth cookies.


Why mess with a good thing?


Scottish Shortbread Cookies

Recipe by Julie Murphy @ Sweet and Spicy Monkey
A subtly sweet, buttery, melt in your mouth shortbread cookie.
Prep time: 5 minutes
Cook time: 35 minutes
Total time: 40 minutes
Yield: 2 dozen shortbread cookies
Ingredients
  • 3 cups All-purpose flour
  • 3/4 cup sugar
  • 2 sticks (1 cup) salted European butter, chilled and sliced into chunks, about Tablespoon size
  • 1 to 2 pinches sea salt
Cooking Directions
  1. Preheat oven to 350F degrees.
  2. Butter one 10" x 9" pan. You can also use two 5" x 9" pans, instead of the one pan. Set aside.
  3. Combine flour, sugar, and salt into the bowl portion of food processor. Pulse to blend.
  4. Add in chunks of butter and mix on High speed for approximately 1 minute. Dough will resemble a sandy texture and clump when squeezed together.
  5. Spoon into prepared pan. If using 2 pans, place half of mixture in each pan.
  6. Press dough mixture down firmly with your hands, flattening it. You can also use the bottom of a glass to get a smooth, even surface.
  7. Using a knife, trace light cuts into surface of dough, about 1" x 2" squares. These will be your "cookie cuts" after baking.
  8. Place into oven and bake for 30-35 minutes, or until shortbread is lightly browned around the edges.
  9. Remove from oven.
  10. Using a sharp knife, immediately cut where you traced lines before baking, cutting the cookies all the way through.
  11. Allow shortbread cookies to cool completely, for at least 1 hour in pan(s).
  12. After cookies have cooled, using a fork or knife, remove cookies from pan and serve. Best served with milk, tea, or coffee.
  13. Can be stored in an airtight container for at least 1 week.

Inspired by ~ Nicole at Baking Bites.

All content and images are property of Sweet and Spicy Monkey. Please do not reprint this content without my permission. If you wish to include this recipe on your site, please re-write in your own words and use your own photographs and link back to this post for original recipe.

Follow Julie's board Sweet and Spicy Monkey on Pinterest.

Monday, January 18, 2016

Sticky Cinnamon Hazelnut Buns


We're halfway through January and I've been having no problems at all staying vegan for this month. For those of you that don't know, my New Year's resolution was to try and stay meatless for the month of January. So far so good! As I haven't had any cravings for meat at all.


How could I possibly miss meat after my Slow Cooker Vegan Sweet Potato and Carrot Chili (that's so hearty you can stand up a spoon in it), my Vegan Buffalo Cauliflower Bites, or my creamy Acorn Squash Risotto?

Another resolution for me to try and knock out this year are some of the recipes on my baking bucket list. It's time for me to conquer my fear (yes, some recipes scare me!) and tackle my baking bucket list. And I've been wanting to make these sticky cinnamon buns since last year.


Now don't let the yeast or the candy thermometer scare you from making these cinnamon buns because they are so easy to make.

The yeast does all the work in helping your dough rise and the candy thermometer assist you in making the ooey, gooey syrup that covers your cinnamon buns.


Without the yeast, you would have flat buns (something nobody wants!) and without the thermometer, you would burn the syrup.

The reason I've avoided making these is because I thought they were time consuming and so hard to make. Silly me thought you had to roll every bun up individually. That is until I actually sat down and read the recipe and found out how easy they are to make.

All this time I wasted because I was afraid of making these sticky, sweet delights. No more!

Plus, I made these sticky cinnamon buns a little healthier by not using any white sugar. I used honey to help activate the yeast, Splenda brown sugar for the filling and syrup, and pure maple syrup for the syrupy topping. A few healthier options without risking any of the sweetness of these cinnamon buns.

And unlike many other recipes that call for pecans, I used hazelnuts. Only because I didn't have any pecans on hand when I made these, but I really think I like the hazelnuts better as they add more flavor and a little more crunch than pecans.

I call that a win-win!

I'm thinking I can make these Sticky Cinnamon Hazelnut Buns for every holiday and maybe sometimes just because.


Because who doesn't love homemade ooey, gooey, sticky cinnamon nutty buns?


Sticky Cinnamon Hazelnut Buns

Recipe by Julie @ Sweet and Spicy Monkey
Sticky, sweet cinnamon buns made with hazelnuts and no refined sugar.
Prep time: 15 minutes
Cook time: 20 minutes
Total time: 3 hours (includes rising time)
Yield: 8 to 9 cinnamon buns
Ingredients for Dough
  • 1/4 cup + 2 Tablespoons unsalted butter, room temperature & cubed
  • 2/3 cup whole milk
  • 3 Tablespoons honey
  • 1 and 3/4 teaspoons active dry yeast
  • 1 large egg, room temperature
  • 2 and 1/4 cups all-purpose flour
  • 1/2 teaspoon sea salt
Directions for Dough
  1. Warm butter, milk, and honey in a small sauce pan. Just before it boils, remove from heat and pour into a large mixing bowl.
  2. Let stand until temperature lowers between 90 and 110F degrees. Once temperature is reached, sprinkle yeast over milk, mix together with a fork, cover with a small clean towel, and let yeast mixture sit for 10 to 15 minutes, until it starts to form bubbles on the surface.
  3. While yeast is activating, grease large mixing bowl using olive oil, butter, or coconut oil. Set bowl aside.
  4. Combine egg, flour, and sea salt to yeast mixture and using dough attachment for stand mixer, knead dough until it becomes smooth and elastic in texture, about 5 minutes.
  5. Shape dough into a ball with your hands and place into greased bowl. Lightly brush exposed surface of dough with olive oil, cover with a clean towel, and place in warm area so dough can rise for about 1 to 1 and 1/2 hours. Dough should double in size during this time.
Ingredients for Filling
  • 1/4 cup Splenda brown sugar
  • 2 Tablespoons cinnamon
  • 1/2 teaspoon sea salt
  • 3 Tablespoons unsalted butter, room temperature
Directions for Filling
  1. To make the filling, add brown sugar, cinnamon, and sea salt to a small bowl. Mix together with a fork and set aside. Place butter by bowl to be used before sprinkling cinnamon brown sugar mixture over dough.
Ingredients for Topping
  • 1/4 cup + 2 Tablespoons unsalted butter, room temperature
  • 1/4 cup Splenda brown sugar
  • 1/4 cup pure maple syrup
  • 1/2 teaspoon sea salt
  • 1 cup chopped hazelnuts
Directions for Topping
  1. To make the sticky topping, generously butter a 9" round cake pan, making sure to butter sides and top overlap (lip of pan). This helps make for easier removal of cinnamon buns. Set aside.
  2. In a small sauce pan, add butter, brown sugar, maple syrup, and sea salt and bring to a boil over medium heat. After mixture begins to boil, continue cooking and stirring continuously over medium heat until temperature reaches 212F (100C) degrees (This is where you need to use your candy thermometer). Once temperature is reached, remove from heat and pour syrup mixture into prepared cake pan.
  3. Sprinkle hazelnuts over syrup mixture. Set aside.
Preparation and Cooking Directions
  1. After dough has risen, place dough on a flat, floured surface and knead for about 1 to 2 minutes.
  2. Roll dough out into a 10" x 10" square shape.
  3. Generously rub softened 3 Tablespoons of butter that we set aside earlier, over entire surface of dough.
  4. Sprinkle cinnamon filling over buttered dough.
  5. Roll dough up tightly and using a sharp knife, cut into 8 or 9 slices.
  6. Place slices into prepared pan, cut side up.
  7. Cover loosely with plastic wrap and a small dry towel. Place in a warm, draft-free area and let dough rise for 1 hour. Dough should double in size.
  8. Before one hour is up, preheat oven to 375F degrees.
  9. After dough has risen, uncover cinnamon buns and bake in preheated oven for 18 to 23 minutes, or until lightly browned.
  10. Remove from oven.
  11. Using a butter knife, gently loosen sides of buns from around pan, and immediately flip over cake pan onto a serving dish or plate. If they stick, gently tap bottom of pan and buns should come out easily. This might take about 30 seconds so don't fret. If they're still not coming out, repeat loosening the edges with butter knife while pan is upside down.
  12. Serve immediately with coffee, tea, or milk.

Inspired by ~ David Levobitz Maple Pecan Sticky Buns.


All content and images are property of Sweet and Spicy Monkey. Please do not reprint this content without my permission. If you wish to include this recipe on your site, please re-write in your own words and use your own photographs and link back to this post for original recipe.
Follow Julie's board Sweet and Spicy Monkey on Pinterest.
Wednesday, December 23, 2015

Copycat Lofthouse Sugar Cookies with Peppermint Frosting


I've been wanting to make these cookies for some time now. I prefer homemade cookies to store bought any day (you can blame my mom for that) but I love Lofthouse cookies!

So when I saw that I could make my own Lofthouse style cookies at home, after I did my happy dance, I knew I had to try them.

It's a simple recipe, but these cookies are far from simple! Big, pillowy, soft sugar cookies with lots of frosting, my kind of cookie!

Before frosting, just look how pillowy soft these cookies are!

I dressed them up for the holidays in peppermint frosting, available in pink or white, with candy cane bits sprinkled over the top.


You can find my recipe for Peppermint Cream Cheese Frosting here. For the pink frosting, add a few drops of red food coloring. Or you can use beet powder or beet juice to desired color. I used about 1 teaspoon of beet powder to give my frosting its pink coloring.


Santa will definitely be looking for these cookies when he stops by your house to deliver presents on Christmas Eve.

Just be sure to leave him a big glass of milk to go with them.

Wishing y'all a very, Merry Christmas!

Lofthouse Style Sugar Cookies

Recipe by Julie Murphy
Big, soft sugar cookies made Lofthouse style with a peppermint frosting.
Prep time: 15 minutes
Cook time: 10-12 minutes
Total time: 40 minutes (does not include chilling time)
Yield: 2 dozen cookies
Ingredients
  • 1 cup granulated sugar
  • 1/2 cup (1 stick) unsalted butter, room temperature
  • 2 eggs
  • 1/2 cup plain Greek yogurt
  • 2 teaspoons vanilla extract
  • 3 cups All-purpose flour
  • 1 and 1/2 teaspoons baking powder
  • 1/2 teaspoon baking soda
  • 1/2 teaspoon sea salt
Cooking Directions
  1. In a large mixing bowl, sift together flour, baking powder, baking soda, and salt. Set aside.
  2. In a separate large mixing bowl, cream together butter and sugar.
  3. Beat in eggs with butter mixture.
  4. Add in yogurt and vanilla, mixing well.
  5. Gradually add in dry ingredients, mixing all ingredients together well.
  6. Remove dough from bowl, wrap in plastic wrap, and refrigerate overnight.
  7. After dough has chilled overnight and when you're ready to bake the cookies, preheat oven to 350F degrees.
  8. Line cookie sheets with parchment paper. Set aside.
  9. Remove dough from refrigerator and let sit for 5 minutes. This makes it easier to work with the dough.
  10. On a dry, flat surface, sprinkle flour and spread it around the surface using your hands. Place dough on floured surface and roll dough out. Sprinkling flour as needed under the dough, on top of dough, and on rolling pin to help prevent dough from sticking to surface.
  11. Roll out to desired thickness. Remember, Lofthouse cookies are thicker than normal cookies and will rise a little bit.
  12. Using a round cookie cutter or the rim of a glass, make circle cuts in dough to make cookies. Place on prepared cookie sheets, leaving cookies 2" apart.
  13. Bake for 10 to 12 minutes, or until cookies are firm to the touch. They may appear under baked. You DON'T want cookies to brown.
  14. Remove from oven and let cool on cookie sheet for 5 to 10 minutes before transferring cookies to a wire rack, where they can cool completely.
  15. Repeat with rest of dough, rolling out dough, making circles, and baking until all dough is used up.
  16. After cookies have cooled completely, about 2 hours, its time to frost them.
  17. Apply frosting generously with a butter knife and sprinkle candy cane bits over the tops. Place back on wire rack and let sit for about 10 minutes before covering with plastic wrap or aluminum foil.
  18. Serve with a tall glass of milk.

*Helpful Hints*

- I refrigerated my dough overnight. Some recipes for Lofthouse style cookies say you can cook immediately, some say to refrigerate for a few hours. I was happy with the results after chilling the dough overnight. I cannot guarantee that your cookies will turn out like mine if you do not chill the dough overnight.

- You need to roll out the dough and use a cookie cutter or rim of a glass to cut cookies. Otherwise you will get a round, ball shaped cookie with rough edges not resembling anything close to a Lofthouse cookie.

- If you're rushed for time, you can use store bought frosting and flavor with 1 to 2 teaspoons of peppermint extract.

Inspired by ~ Ashley at Center Cut Cook.

All content and images are property of Sweet and Spicy Monkey. Please do not reprint this content without my permission. If you wish to include this recipe on your site, please re-write in your own words and use your own photographs and link back to this post for original recipe.

Tuesday, December 22, 2015

Gingerbread Cookies


With all the hustle and bustle of the Christmas holiday, who has time to sit down and read right now? Not me.

So I'm keeping it short, sweet, and simple. Just like these Gingerbread cookies.
 
These ginger spice cookies are always a holiday favorite, especially when they're made into little gingerbread man shapes. Or large gingerbread man cookies like this one I made.


You can eat them plain (my favorite way to enjoy them), frost them with royal icing or a simple cookie glaze, or sprinkle powdered sugar over them. They're delicious either way!


And since I know you have so much to do before Christmas, here's my recipe for Gingerbread cookies.

Just do me a favor and enjoy these cookies when you finally get a chance to sit down and relax. You'll thank me when you do.

You're welcome!

Gingerbread Cookies

Recipe by Julie Murphy
Gingerbread cookies are a favorite during the Holidays with their ginger, molasses, and spice flavors.
Prep time: 15 minutes
Cook time: 8-12 minutes
Total time: 1 hour and 15 minutes (does not include refrigeration time)
Yield: 6 dozen or 1 large gingerbread man + 5 dozen regular size cookies
Ingredients
  • 3/4 cup unsalted butter, room temerature
  • 3/4 cup brown sugar, packed
  • 3/4 cup molasses
  • 1/2 teaspoon sea salt
  • 2 teaspoons cinnamon
  • 2 teaspoons ground ginger
  • 1/4 teaspoon ground cloves
  • 1/4 teaspoon ground black pepper
  • 1 teaspoon vanilla extract
  • 1 large egg
  • 1/2 teaspoon baking soda
  • 1 teaspoon baking powder
  • 3 cups + 2 Tablespoons All-purpose flour
Cooking Directions
  1. Add flour, baking soda, baking powder, salt, pepper, and spices together in a large bowl. Using a whisk or fork, stir dry ingredients together. Set aside.
  2. In a separate large mixing bowl, cream together butter, molasses, brown sugar, and vanilla.
  3. Add egg and beat until mixed.
  4. Gradually add in dry ingredients until mixture is combined.
  5. Divide dough in half, wrapping each half in plastic wrap, and refrigerate overnight.
  6. When ready to bake the next morning, remove 1 batch of dough from refrigerator and let sit for 5 minutes so it will be easier to work with.
  7. Prepare cookie sheets by lining with parchment paper. Set aside.
  8. Preheat oven to 350F degrees.
  9. Unwrap dough and on a dry, flat, floured surface, roll dough out. Keep in mind, the thinner the dough, the crisper the cookie. So if you want a chewy cookie, leave dough a little thicker. It doesn't take much thickness to keep the cookies chewy.
  10. Flour under dough, on top of dough, and on rolling pin frequently or dough will stick to surfaces.
  11. Using cookie cutters, cut out shapes and place onto prepared cookie sheets, leaving cookies about 2" apart. Repeat with remaining dough, rolling out and cutting out shapes.
  12. Bake for 8-12 minutes, until cookies feel firm or cookies are a very light brown around the tips.
  13. Remove from oven and let cool for 5-10 minutes on cookie sheet before transferring to a wire rack.
  14. Repeat with remaining dough, rolling out, cutting out shapes, and baking.
  15. Let cookies cool completely before decorating. You can decorate with frosting, royal icing, a simple cookie glaze, or powdered sugar sprinkled over the top (as shown in photos).
  16. Or you can leave them plain, my favorite way to eat them!
  17. Store in an airtight container for up to 1 week.

Cutting out my gingerbread man shapes. 
 
Gingerbread man cookies coming out of the oven.

Gingerbread cookies all done!

All content and images are property of Sweet and Spicy Monkey. Please do not reprint this content without my permission. If you wish to include this recipe on your site, please re-write in your own words and use your own photographs and link back to this post for original recipe.

Saturday, December 19, 2015

Peppermint Chocolate Cake Pops


I never thought in my wildest dreams that I would be sharing a cake pop recipe with you.

Mainly because I thought they were trendy and I try to stay away from trends. I like marching to my own drummer. A little bit of a rebel, perhaps, but definitely not a trend follower. But sometimes trends are not trends, but ideas that turn out to be game changers, like cake pops.

With my second attempt on Swiss Cake Rolls failing...again, there I was, with another cake recipe I could not share with y'all. I had to find a way to make use of it or it would somehow disappear.

My hips and waistline were begging me No, not again!


And since I had already shared a trifle recipe with you from the first Swiss Cake Roll fail, I had to think of another recipe, so Cake Pops it was. And not just plain cake pops, but Peppermint Chocolate Cake Pops decorated with candy cane bits for the Christmas holiday.

I am so happy I finally made cake pops because:

  1. they are just so darn cute
  2. they're easy and fun to make
  3. they're portion controlled (Hello, diet) and
  4. they are so yummy!
They're like a little taste of Christmas in a single bite with their chocolate peppermint middle and peppermint candy sprinkles.

You can make cake pops for any occasion since you can decorate them any way you want which is half the fun of making them!

I would suggest watching Bakerela's video on YouTube before making these if this is your first time because she is the person behind cake pops and she has some great tips on making them. There's also other food bloggers out there who have picked up a few good tips for making cake pops too.

A great time to do this is while your cake is cooling off or while your chilling the cake balls before dipping.

Now I used red and white candy melts separately for dipping and I also combined them for a pink peppermint color. You can experiment with what you like as your imagination is the limits.


If you’re lucky, I just might mess up another Swiss Cake Roll on purpose because I'm really liking loving these recipes that are coming out of my mistakes. And I hope you do too!

If you make these Peppermint Chocolate Cake Pops, tag me on your social media channels so I can see how yours turned out.

Happy Cake Pop Making!

Peppermint Chocolate Cake Pops
Peppermint Cake Pops are prefect for the Christmas Holidays!
Total time: 2 hours
Yield: Makes about 3 dozen cake pops

Ingredients

  • 1 box Devil's food cake mix, any brand + ingredients needed to make
  • 1/2 cup peppermint crunch baking chips
  • 1/2 cup (1 stick) unsalted butter, room temperature
  • 1-8 ounce package cream cheese, room temperature
  • 3-4 cups powdered sugar
  • 1-2 teaspoons peppermint extract
  • 1 cup peppermint candy bits
  • 1- 12 ounce package white candy melts
  • 1- 12 ounce package red candy melts
  • 1 package Lollipop sticks
  • 1 Styrofoam lid or block, or cake pop stand

Cooking Directions

  1. Prepare cake mix as directed on box. Fold in 1/2 cup peppermint crunch baking chips. Bake as directed on box. Remove from oven when done and let cool to room temperature.
  2. To make peppermint cream cheese frosting: Cream together butter, cream cheese, and peppermint extract.
  3. Slowly add in powdered sugar, 1 cup at a time, starting with a low speed and gradually increasing speed so sugar doesn't fly out of the bowl. You can always add in more powdered sugar, 1 Tablespoon at a time, if you prefer your frosting sweeter.
  4. Once cake has cooled, crumble into a large mixing bowl.
  5. Stir in 1/3 cup of peppermint frosting. You can use a wooden spoon, a fork, or your hands to mix the frosting with the cake crumbs.
  6. Add in more frosting, 1 Tablespoon at a time, until you get an even mixture of cake and frosting. You want just enough frosting so the cake crumbs will stick together when rolled into a ball without looking clumpy or falling apart. On the other side, you don't want the cake mixture too wet or mushy.
  7. Using a cookie scoop, scoop cake mix and roll together between your palms into a ball shape. Place on cookie sheet lined with wax paper. Repeat process until all mixture is shaped into balls.
  8. Cover with plastic wrap, place in refrigerator and let balls chill for 1 hour or overnight.
  9. *Do not place cake balls in freezer before dipping or it may cause the chocolate to crack after dipping.*
  10. After balls have chilled, its now time to prepare them for dipping. Melt candy melts as directed on package. Dip the tip of lollipop stick into the melted candy melts and insert into the flat side of the cake balls (the side they have been resting on), inserting a little less than halfway.
  11. Place cake balls with sticks back in refrigerator and let chill for 15 minutes.
  12. After lollipop sticks have had a chance to set, its now time to dip. You may need to heat up candy melts again in microwave to soften them before dipping. Let sit for 15 seconds before dipping cake balls.
  13. Grab cake ball by the lollipop stick and dip into the candy melts until entire cake ball is covered and remove. Do not twirl, turn, or swirl cake ball in candy melts because this may cause the cake ball to fall apart and leave crumbs in dipping candy. Just dunk straight into melted candy and out. If you need to cover a bare spot, use a spoon to pour melted candy over the spot. You can use a clean toothpick to lightly wipe any excess melted candy off of the lollipop stick.
  14. After cake ball has been dipped, slowly rotate until excess chocolate has dripped off.
  15. Decorate right away by holding cake pop over a small bowl and sprinkling with peppermint candy bits.
  16. Place decorated cake pop into a Styrofoam lid or block, or a cake pop stand and let cool.
  17. Serve immediately or store in freezer in a zip lock bag.
  18. If freezing, let cake pops sit out for about 10 minutes before eating.

Inspired by ~ Angie from Bakerella.

All content and images are property of Sweet and Spicy Monkey. Please do not reprint this content without my permission. If you wish to include this recipe on your site, please re-write in your own words and use your own photographs and link back to this post for original recipe.

Thursday, December 10, 2015

Red Velvet Peppermint Trifles


Really this recipe should be called Red Velvet Swiss Cake Roll fail made into trifles or what to do when your Red Velvet Swiss Cake Roll doesn't quite turn out like....can't even distinguish what it is.... what the (insert expletive) is that....doesn't look anything similar to the photo from the recipe you used.

But I thought the Red Velvet Peppermint Trifles sound so much prettier, don't you agree? Not to mention they look a whole lot prettier than my Swiss Cake Roll fail!

My Swiss Roll Cake Fail!

I'm trying to keep positive and show you the other side of baking, which is what to do when things don't always turn out like you want.

Just like that old adage, "when life gives you lemons, make lemonade." I kind of did the same thing here by turning my fail into a delicious dessert that I can still share with you!

Here I used tall shot glasses for the photos, but you can serve them in anything you want from a glass pudding cup, a glass coffee cup, champagne or wine glasses, or mix it up and use them all!


Not only are these Red Velvet Peppermint Trifles festive with their red and white coloring but they taste just like Christmas should. The luscious cream cheese frosting, the chocolate cake, and the peppermint flavors from whipped cream and peppermint sprinkles....YUM!

It almost makes me want to mess up the next Swiss Cake Roll for some more of this! Not like I would ever do that on purpose. No!

Never!

Not me!


Well, maybe {smile}.

Red Velvet Peppermint Trifles

Recipe by Julie Murphy
Red Velvet cake, cream cheese frosting, and peppermint whipped cream come together in this Holiday dessert trifle.
Prep time: 20 minutes
Cook time: 30 minutes (for cake)
Total time: 50 minutes
Ingredients
  • 1 Red Velvet Cake Mix, plus ingredients for making
  • 1 cup (2 sticks) unsalted butter, softened
  • 2-8 ounce packages cream cheese, room temperature
  • 1 and 1/2 teaspoons vanilla extract
  • 6 and 1/2 cups powdered sugar (for frosting)
  • 2 cups heavy cream
  • 2 cups powdered sugar (for peppermint whipped cream)
  • 2 teaspoons peppermint extract
  • 1 -10 ounce bag peppermint crunch baking chips
Cooking Directions
  1. Preheat oven to temperature noted on box of cake mix.
  2. Spray one sheet cake pan or 9" x 15" cookie sheet with non-stick cooking spray & line with parchment paper. Set aside
  3. Prepare cake mix as directed on box. Bake and remove from oven. Let cool before frosting.
  4. To prepare cream cheese frosting:
  5. Cream together butter, cream cheese, and vanilla in a large mixing bowl.
  6. Gradually add in powdered sugar 1 cup at a time, starting with a low speed and gradually increasing speed so sugar doesn't fly out of the bowl. (Not like that happened to me!)
  7. If you prefer a sweeter frosting, you can gradually add in more powdered sugar to taste.
  8. Spoon into an airtight container and let chill in the refrigerator while cake cools.
  9. To make Peppermint Whipped Cream:
  10. Using a whip attachment, whip together heavy cream, peppermint extract, and powdered sugar in a large mixing bowl until stiff peaks appear, approximately 5 minutes.
  11. Once you get desired thickness of whipped cream, spoon into an airtight container and chill in refrigerator.
  12. Once cake has cooled (at least 2 hours), frost with cream cheese frosting.
  13. To assemble trifles:
  14. Take a spoonful of frosted cake and place into bottom of dish, add a dollop of peppermint whipped cream over cake, sprinkle with peppermint crunch baking chips, repeat to fill dish, topping with peppermint whipped cream and a sprinkling of peppermint crunch baking chips.
  15. Serve immediately or chill until time to serve.

All content and images are property of Sweet and Spicy Monkey. Please do not reprint this content without my permission. If you wish to include this recipe on your site, please re-write in your own words and use your own photographs and link back to this post for original recipe.
Follow Julie's board Sweet and Spicy Monkey on Pinterest.

Friday, December 4, 2015

S’mores Chocolate Chip Graham Cracker Cookie Pie


Today is National Cookie Day and what better way to celebrate than with this S'mores Chocolate Chip Graham Cracker Cookie Pie. You can trust me when I tell you, as soon as you're done baking this, it will be all gone before you even get the name out of your mouth!

I've combined graham crackers to chocolate chip cookie dough, pressed them into a pie pan, and baked. Just before baking is done, I sprinkle miniature marshmallows over the top and bake just enough to get them all toasted and gooey.


The end result is a deliciously chewy, chocolatey, graham cracker cookie in the shape of a pie with ooey gooey marshmallows. Just like S'mores, but in a cookie pie!


Perfect for the days your craving S'mores so you can be reminded of fun times around the campfire with your loved ones.

Or maybe anytime you're craving a combination of chocolate, graham crackers, and marshmallows.


Happy National Cookie Day!

S'mores Chocolate Chip Graham Cracker Cookie Pie

Recipe by Julie Murphy
The flavors of everyone's favorite, S'mores, all in one cookie pie.
Prep time: 15 minutes
Cook time: 30 minutes
Total time: 45 minutes
Yield: 1 cookie pie
Ingredients
  • 1 cup + 2 Tablespoons all-purpose flour
  • 1/2 teaspoon baking soda
  • 1/2 teaspoon sea salt
  • 1/2 cup (1 stick) unsalted butter, softened
  • 6 Tablespoons sugar
  • 6 Tablespoons brown sugar, packed
  • 1/2 teaspon vanilla extract
  • 1 large egg
  • 4 whole graham crackers, crumbled
  • 1 cup semi-sweet chocolate chunks
  • 2 cups miniature marshmallows (for topping)
Cooking Directions
  1. Preheat oven to 350F degrees.
  2. Spray a 9" x 2" pie pan with non-stick cooking spray. Or you can grease with butter or margarine. Set aside.
  3. In a medium bowl, add flour, baking soda, and sea salt. Set aside.
  4. In a large mixing bowl, beat together butter, sugar, brown sugar, and vanilla.
  5. Add egg, beating well.
  6. Gradually add in flour mixture, mixing well.
  7. Fold in graham cracker crumbs and chocolate chunks, blending throughout dough.
  8. Spoon dough mix into prepared pie pan, spreading evenly and pressing down and out, covering entire inside of pie pan.
  9. Place into oven and bake for 20-25 minutes, or until golden brown.
  10. After cookie is done, remove from oven, sprinkle mini marshmallows over the entire top of the cookie pie, and place back into oven for another 5 to 7 minutes, or until marshmallows have a light tan color.
  11. Remove from oven and let cool.
  12. Best served with a tall glass of cold milk.

All content and images are property of Sweet and Spicy Monkey. Please do not reprint this content without my permission. If you wish to include this recipe on your site, please re-write in your own words and use your own photographs and link back to this post for original recipe.
Follow Julie's board Sweet and Spicy Monkey on Pinterest.

Friday, November 27, 2015

Chai Tea Pumpkin Pie


I'm not much of a tea drinker. I'm definitely a coffee drinker as you best make sure I have my coffee first before even speaking to me in the mornings.

Did I mention I'm not much of a not at all a morning person either?

However, I do love to drink tea in the colder months or when I get sick and coffee just makes my head hurt.

My favorite kind of tea is chai tea. I fell in love with it after I tried Starbucks Chai Tea Latte.

Oh, if you haven't tried it yet, it's everything like fall should taste like, with warm spices of ginger, cinnamon, cardamom, and black pepper all blended together with black tea. Mmmm….


Which brings us to today's recipe, Chai Tea Pumpkin Pie. A pie that stands alone with a blend of fall spices along with pumpkin chai tea made into a pie!


Did I mention the gingersnap cookie crust? Oh yes I did!

I've been wanting to make a gingersnap cookie crust for some time now and I knew this would be the perfect recipe for it.

Not only can you smell the spices in it, but the flavors are A-M-A-Z-I-N-G!

You'll be going back for seconds with this pie. Ok, maybe thirds and fourths, your secret is safe with me. Just as long as you save me a slice!


Serve me a cup of coffee and this pie and I'll be yours for life, no matter what time of day it is!

Chai Tea Pumpkin Pie

Recipe by Julie Murphy
An infusion of pumpkin chai tea and spices make this delicious Chai Tea Pumpkin Pie perfect for Thanksgiving holidays.
Prep time: 25 minutes
Cook time: 55 minutes
Total time: 1 hour and 10 minutes (includes cooking crust time)
Yield: 1 - 9" pie
Ingredients
  • 4 and 1/2 cups gingersnap cookies
  • 8 Tablespoons (1 stick) unsalted butter, melted
  • 3/4 cup granulated sugar
  • 1/2 teaspoon sea salt
  • 1 teaspoon cinnamon
  • 1/2 teaspoon ground ginger
  • 1/4 teaspoon ground cloves
  • 1/4 teaspoon ground cardamom
  • 2 tea bags pumpkin chai tea
  • 2 large eggs
  • 1-15 ounce can 100% pure pumpkin puree
  • 1-12 ounce can evaporated milk
Cooking Directions
  1. Preheat oven to 325F degrees.
  2. Place gingersnap cookies into a food processor or high speed blender and pulse a few times until cookies resemble fine crumbs. Pour cookie crumbs into a medium size mixing bowl.
  3. Melt butter in microwave on High for about 45 seconds or until butter is melted. This might take a little longer depending on how your microwave cooks.
  4. Pour butter into crumbs and mix together, combining all crumbs with butter.
  5. Press buttered crumbs into a 9" circumference x 2" deep pie pan, including bottom and sides.
  6. Place into oven and bake for 8-10 minutes.
  7. Remove from oven and let cool to room temperature.
  8. To make pie filling:
  9. Preheat oven to 350F degrees.
  10. Cut tea bags open and pour ingredients into a spice grinder and grind until fine powder.
  11. If using a food processor or high speed blender, add tea bag ingredients, 1/4 cup of the pumpkin puree and 1/2 can of evaporated milk. Pulse 4 to 5 times until tea bag ingredients are finer. Add remaining can of evaporated milk, sea salt, cinnamon, ginger, cloves, cardamom and pulse 3 to 4 more times until blended.
  12. In a large mixing bowl, beat eggs. Add in sugar and remaining pumpkin, blending well. Combine evaporated milk mixture.
  13. Pour into cooled pie shell.
  14. Place into oven and bake for 45-55 minutes or until knife inserted into middle of pie comes out clean.
  15. Remove from oven and let cool on a wire rack for at least 2 hours.
  16. Serve after pie has cooled or refrigerate. If refrigerating, make sure pie is cool before covering for storage.
  17. Best served with Maple Whipped Cream on top. Recipe below.

Homemade Maple Whipped Cream

Recipe by Julie Murphy
A delicate maple flavored homemade whipped cream.
Prep time: 5 minutes
Cook time: 0
Total time: 5 minutes
Yield: 2 cups
Ingredients
  • 1 cup heavy cream
  • 1/2 teaspoon vanilla extract
  • 1 Tablespoon powdered sugar
  • 2 Tablespoons pure maple syrup
Directions
  1. Add all ingredients into a mixing bowl.
  2. Using a wire whisk, whip until stiff peaks start to form or desired thickness of whipped cream. I always like mine a little thicker so I whip for about 4 to 5 minutes.
  3. Place into an airtight container and let chill.
  4. Store in refrigerator up to 1 week.
  5. Use anywhere whipped cream is called for in a recipe.

Pie recipe inspired by ~ Libby's Famous Pumpkin Pie recipe from the label of 100% Pumpkin product. 

All content and images are property of Sweet and Spicy Monkey. Please do not reprint this content without my permission. If you wish to include this recipe on your site, please re-write in your own words and use your own photographs and link back to this post for original recipe.
Follow Julie's board Sweet and Spicy Monkey on Pinterest.

Saturday, November 7, 2015

Pumpkin Oatmeal Raisin Bar Cookies


I'm probably the last person to jump on the pumpkin bandwagon, but I've had good reason not to just yet. As I've been experiencing apple love! I can't get enough of their sweet, tart flavors.

However, since it's November, I only thought it appropriate to make a pumpkin recipe (finally!). And this recipe was well worth the wait, Pumpkin Oatmeal Raisin Bar cookies.

Think of an oatmeal raisin cookie and then add pumpkin! I had no idea of the scrumptiousness I would be biting into when I made these cookies.

It's been years since I made pumpkin cookies. Let's just say, I still lived at home with my parents the last time I made pumpkin cookies. Yes, that long!

Why I waited so long to make another batch is beyond me. To make up for lost time, I might start making these cookies every month because they are just that good!


Don't take my word, just look at them! How can you say no to that?

That would be like telling [insert name of your favorite celebrity crush here.] For me, it’s Brad Pitt (if he was single, of course, because we all know he's married to you Angelina) "No, I cannot go out with you tonight Brad because I have to do laundry."

Just. Stupid. Good.

What? Did I just compare Brad Pitt to a cookie?

No, well, maybe. All I'm saying, is if Brad Pitt were a cookie, he might look like and taste like these Pumpkin Oatmeal Raisin Bar cookies because these are some yummy and handsome looking pumpkin cookies!


Oooh! I think I just named a cookie Brad Pitt!

Whatever you call these cookies, I’m sure you will love them to the very. Last. Crumb.

Pumpkin Oatmeal Raisin Bar Cookies

Recipe by Julie Murphy
Deliciously soft Pumpkin Oatmeal Raisin Cookie Bars that are perfect for Halloween and Thanksgiving time.
Prep time: 10 minutes
Cook time: 35 minutes
Total time: 45 minutes
Yield: Approximately 3 dozen bar cookies
Ingredients
  • 2 and 1/2 cups all-purpose flour
  • 2 and 1/2 teaspoons baking powder
  • 1/2 teaspoon sea salt
  • 1 teaspoon pumpkin pie spice
  • 1/2 teaspoon cinnamon
  • 1/4 teaspoon ginger
  • 2 Tablespoons corn starch
  • 3/4 cup (1 and 1/2 sticks) unsalted butter, room temperature
  • 1 and 3/4 cup brown sugar, packed
  • 1 teaspoon vanilla extract
  • 2 large eggs
  • 1/2 cup pure pumpkin puree
  • 1 and 1/2 cups old fashioned oats, uncooked
  • 1 cup raisins
  • 1-10 ounce package pumpkin spice chips
Cooking Directions
  1. Preheat oven to 350F degrees.
  2. Prepare 15" x 10" cookie sheet by greasing with butter, margarine, or a non-stick cooking spray. Set aside.
  3. Add flour, baking powder, sea salt, pumpkin pie spice, cinnamon, ginger, and corn starch into a medium size bowl. Set aside.
  4. In a large mixing bowl, cream together butter, brown sugar, and vanilla.
  5. Add in eggs one at a time.
  6. Blend in pumpkin puree.
  7. Slowly add in dry ingredients until blended throughout dough.
  8. Blend in oats.
  9. By hand, fold in raisins and pumpkin spice chips.
  10. Using a spatula or wooden spoon, evenly spread dough onto prepared cookie sheet.
  11. Place in preheated oven and bake for 25 to 35 minutes.
  12. Remove from oven and let cool for 15 to 20 minutes before cutting into squares. You can cut them any size you desire, big squares or small squares for little hands.
  13. Best stored in an air-tight container.

All content and images are property of Sweet and Spicy Monkey. Please do not reprint this content without my permission. If you wish to include this recipe on your site, please re-write in your own words and use your own photographs and link back to this post for original recipe.
Follow Julie's board Sweet and Spicy Monkey on Pinterest.