Sweet and Spicy Monkey has moved to: www.sweetandspicymonkey.com

Showing posts with label lemon. Show all posts

Monday, December 28, 2015

Overnight Cranberry Lemon Eggnog French Toast


I hope y'all had a lovely Christmas and got everything you wanted from Santa.

These last few weeks of December are all about family, friends, loved ones and spending time together.

Since breakfast is the most important meal of the day and everyone is still rolling out of bed and stumbling to the kitchen for their coffee, it only makes sense to prepare breakfast for everyone.

The easiest way to do that is by making this Overnight Cranberry Lemon Eggnog French Toast. You prepare it the night before so all you have to do in the morning is warm up the oven, toss it in, bake it up, and serve. It will be done by the time your coffee is ready.


Some might even say Easy peasy! Oh yes I did! I just said that. But only because it's true!

This French toast is so delicious you don't even need to put anything else on it! Homemade Brioche bread, fresh cranberries, walnuts, and candied lemons sprinkled throughout, with eggnog poured over the top, and left to sit all night so all the goodness can soak in.


But if you insist, you can serve this with powdered sugar sprinkled over the top, with maple syrup, with simple cranberry syrup, or sugared cranberries like I have here.

What better way to gather everyone around the kitchen table in the morning than with this French Toast casserole?

Ok, having your own personal Italian barista with coffee bar would do it too, but I don't see too many people doing that.

And if you do, my bags are packed and I'm coming over!

Have I mentioned how much I love my morning coffee?

Not as much as I love this Overnight Cranberry Lemon Eggnog French Toast, of course!


Just leave the key under the doormat for me so I can let myself in.

Overnight Cranberry Lemon Eggnog French Toast

Recipe by Julie Murphy
A skinny version of overnight French toast that is as delicious, if not better, than the heavy cream, butter laden French toasts out there.
Prep time: 10 minutes
Cook time: 40 minutes
Total time: 50 minutes (not counting overnight)

Ingredients

  • 1 loaf Brioche bread, cut into 1" cubes
  • 3/4 cup walnuts, chopped
  • 1 cup fresh cranberries
  • 1/4 cup Paradise candied lemons
  • 4 large eggs
  • 2 and 3/4 cup Silk Nog
  • 1/3 cup Splenda brown sugar
  • 2 teaspoons vanilla extract
  • 1/2 teaspoon cinnamon
  • 1/4 teaspoon ground nutmeg
  • 1/8 teaspoon ground cloves
  • 3 Tablespoons butter, melted

Cooking Directions

  1. Using coconut oil or olive oil, grease an 8"x8" baking dish. If you prefer, you can also use margarine or butter.
  2. Layer the bottom of the dish with half of the bread cubes, filling in all gaps.
  3. Sprinkle cranberries, walnuts, and candied lemons over the bread.
  4. Layer with remaining bread cubes. Set aside.
  5. Prepare Nog mix by whisking together eggs, Nog, brown sugar, vanilla, cinnamon, nutmeg, and cloves.
  6. Pour evenly over bread cubes.
  7. Cover and place in refrigerator overnight.
  8. In the morning, preheat oven to 375F degrees.
  9. Remove dish from refrigerator and let sit at room temperature for 20 to 30 minutes before baking.
  10. Bake for 30 to 40 minutes, until top is lightly browned and liquid is absorbed. You don't want a lot of liquid because then it will be drippy toast, but not too dry either. A little liquid is ok because it will absorb.
  11. After removing from oven, pour melted butter over the top and let sit for 5 minutes.
  12. Serve as is or you can top with maple syrup, sugared cranberries, candied lemons, cranberry syrup, or sprinkle with powdered sugar.

*Helpful Hints*

- Recipe for Brioche Bread can be found here ~ It Bakes Me Happy

- You can substitute brown sugar, butter, and real eggnog for this recipe too. I just thought I would lighten it up a bit without changing the flavors.

- Silk Nog is found by eggnog in your stores refrigerator section, usually by the coffee creamer.

Inspired by ~ Abby at Manilla Spoon

Thank you to Paradise Fruit Company for supplying the candied lemons for this recipe.

Disclaimer ~ I am not affiliated with Splenda or Silk, nor was I sponsored or paid by them to use their products for this recipe. I used their products to help lighten up this French toast recipe.

All content and images are property of Sweet and Spicy Monkey. Please do not reprint this content without my permission. If you wish to include this recipe on your site, please re-write in your own words and use your own photographs and link back to this post for original recipe.

Wednesday, September 30, 2015

Citron Dansk Kage - Lemon Danish Cake (Pastry)


I love October! The reasons I love October are the cooler temperatures, the leaves changing colors, football season, and Halloween is this month, which means scary movie marathons!

I always love watching old time classic horror movies like Bride of Frankenstein, Frankenstein, Dracula, Nosferatu. Bella Lugosi is one of the best actors to portray Dracula to this day.

I was also lucky enough to grow up with the original Halloween movies like Friday the 13th, Halloween, Nightmare on Elm Street, and The Shining.

Oh sure, there's been a few good ones since, the remake of Texas Chainsaw Massacre, The Ring, Blair Witch Project, and Paranormal Activity.

But anymore their either corny or just too predictable. Maybe it's because I'm not a teenager anymore and I can see the stupid decisions they're always making. Like going out to the garage by yourself at night when you know the serial killer is on the loose. Or leaving the party at midnight by yourself and walking through the graveyard.


I mean, Hello, what are you thinking? Have a little common sense here people. Sigh. Does this mean I've finally grown up? Nah, can't be that!

What better way to honor the king of horror himself, Vincent Price, than to make a recipe this month from his cookbook, "A Treasury of Great Recipes". In celebration of its 50th anniversary, this wonderful cookbook has been recently re-released.

And my friends over at The Daily Meal came up with an idea for us to recreate one of three recipes (out of many) that Vincent Price and his wife, Mary, put together for this cookbook.

The three recipes we could choose from are:
  1. Guacamole
  2. Spaghetti alla Bolgnese
  3. Dansk Kage (Danish pastry)
I challenged myself and made the Dansk Kage, which is a Danish pastry. Kage translates into cake, but it is a pastry. I have never attempted to make a Danish pastry before, let alone any type of pastry, so I was going into uncharted territory with this recipe.


Especially since I didn't have a photo or YouTube video to follow as I made this. Technology can make things so much easier sometimes!

I mean, what's the worst that could happen? After all, if it's a scary looking Danish then that kind of captures the whole scary movie/horror mood, right?

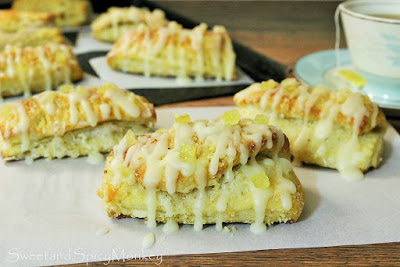
Lucky for you, they turned out amazing. Flaky, buttery dough that has a hint of lemon and almond flavors with a lemon glaze icing and a sprinkling of candied lemons over the top...Mmm!


The lemon flavoring with the glaze icing and the candied lemons on top are my own touch to this delicious Danish pastry.

These lemon Danish pastries are great for breakfast, especially Sunday brunches. They bring that personal touch to your brunch.

They also make for great snacks while watching all the upcoming scary movie marathons!

Citron Dansk Kage - Lemon Danish Cake (Pastry)

Prep time: 2 and 1/2 hours (includes dough rising and chilling time)
Cook time: 10 to 15 minutes
Total time: 3 hours
Ingredients
  • 4 cups + more for rolling out dough All-Purpose flour, sifted
  • 1 teaspoon sea salt
  • 1 cup granulated sugar
  • 1 package Active dry yeast
  • 1/4 cup lukewarm water
  • 1 egg, beaten
  • 1 cup milk
  • 1/2 teaspoon ground nutmeg
  • 1/2 teaspoon lemon extract
  • 1/2 teaspoon almond extract
  • 2 cups (4 sticks) butter, softened
  • 1/2 cup ground almonds
  • 1 egg white, beaten
  • 2 Tablespoons chopped almonds
  • 1 Tablespoon sugar, for sprinkling on top
  • 2 Tablespoons candied lemons, for sprinkling on top after icing
Directions
  1. In a large mixing bowl, add 4 cups sifted flour, salt, and 1/4 cup sugar. Mix with a wire whisk. Set aside.
  2. In a small glass or bowl, mix together lukewarm water and package of active dry yeast until yeast is dissolved. Pour yeast mix into dry ingredients and blend together.
  3. Using the dough attachment for your stand mixer, combine 1 beaten egg, warm milk, nutmeg, lemon extract, and almond extract into bowl with other ingredients. Mix together until dough becomes soft and pliable.
  4. Remove dough from bowl and place onto a flat, floured surface. Shape into a ball.
  5. Place dough into a warm, buttered bowl. Lightly brush melted butter over the top to help prevent cracking. Cover with a small towel and place in a warm area with no drafts, for 30 to 45 minutes, to allow dough to rise. Dough should double in size.
  6. After this time, remove dough from bowl and place on a flat, floured surface. Roll out dough into a square shape, until its 1/2 inch thick.
  7. Place 2 cups butter into a microwavable dish (a large measuring cup works great for this) and place into microwave until butter becomes melted, about 45 seconds to 1 minute. Stir after removing from microwave.
  8. With a pastry brush, lavishly brush on butter over 2/3 of the dough surface, leaving 1/3 unbuttered.
  9. Fold the unbuttered portion over once, fold the buttered portion of dough on top of it, so there are 3 layers of dough.
  10. Roll dough out to a square shape, until its about 3/4 inch thick, and repeat buttering and folding dough on top of itself 2 more times.
  11. Place the dough as is, back into the buttered bowl, covering with a small towel and place into refrigerator (or a cold place) for 30 minutes.
  12. While dough is in refrigerator, mix together 1/4 cup sugar and 1/4 cup melted butter in a small bowl. Cover and set aside.
  13. In a separate bowl, mix together 1/2 cup melted butter, 1/2 cup sugar, and 1/2 cup ground almonds to make almond paste. Cover and set aside.
  14. After 30 minutes, remove dough from refrigerator and roll out on a flat, floured surface until dough is 1/4 inch thick.
  15. Lavishly brush melted butter and sugar mixture over the top of the dough.
  16. Using a sharp knife, cut dough into squares measuring 4 inches.
  17. Place 1/2 to 1 teaspoon of almond paste down the center of each square. Fold over dough and seal edges together using a fork. Using the tip of a sharp knife, make 3 cuts in center of dough.
  18. Gently move Danishes onto a cookie sheet lined with parchment paper.
  19. At this time, preheat oven to 450F degrees.
  20. Place the Danish tray into your refrigerator for 20 minutes.
  21. While completed Danishes are chilling, add 1 egg white to a small bowl or cup and whip for 30 seconds.
  22. If you don't have any leftover ground almonds, chop 2 Tablespoons almonds and place into a small bowl.
  23. After Danishes have chilled for 20 minutes, remove from refrigerator, brush tops of Danish with egg white, sprinkle sugar and chopped almonds over the top.
  24. Place into oven and bake for 10 to 15 minutes, or until tops are golden brown.
  25. Remove from oven, transfer to a wire rack, and let cool completely.

Lemon Glaze Icing

A subtle, lemon glaze icing that's wonderful over, Danishes, breads, cookies, or cakes.
Prep time: 5 minutes
Ingredients
  • 1 cup powdered (confectioner's) sugar
  • 1 and 1/2 Tablespoons lemon juice
  • 1/4 teaspoon vanilla extract
  • 2 teaspoons water
  • 2 teaspoons milk
  • 1 Tablespoon butter, melted
Directions
  1. Mix together all ingredients in a small mixing bowl.
  2. Using a spoon, drizzle icing over Danishes in a back and forth motion until you achieve desired look.
  3. Sprinkle with candied lemons.
  4. Best served warm with coffee or tea.


I would like to thank Paradise Fruit Company for the candied lemon peels used in this recipe.
 
All content and images are property of Sweet and Spicy Monkey. Please do not reprint this content without my permission. If you wish to include this recipe on your site, please re-write in your own words and use your own photographs and link back to this post for original recipe.
Follow Julie's board Sweet and Spicy Monkey on Pinterest.

Saturday, September 5, 2015

Hibiscus Lemon Tea


This has got to be the best drink recipe I've shared!

I came about this recipe when I was attempting to make hibiscus lemonade. In case you don't know, hibiscus is tart, not sweet and not sour, just tart. Add lemon and hibiscus together and we're talking major sour face. I couldn't find a sweet combination of the two by themselves without adding in a whole bag of Stevia in the raw, so I decided to add in tea to help mellow out the tart flavoring.

I'm not much of a tea drinker except when I get sick. But when I do drink tea, I love chai tea. I love the mixture of cardamom, cinnamon, ginger, cloves, and black peppercorn. So when I opened up my cupboard to see what kind of tea I had, I was pleasantly surprised to find some chai tea still in there. Let's say I was rather lucky because otherwise this would be hibiscus lemon gingerbread tea!


The chai tea was the perfect complement to the hibiscus and lemon with its warming spices. And with the colder months coming up, this tea can also be served hot, so you can enjoy it all year long! That's what I call a win-win!

With the remaining hibiscus flowers, I made hibiscus ice cubes to serve in this Hibiscus Lemon Tea. I think they make it pretty, don't you? Directions how to make these decorative ice cubes is down below under Helpful Hints.


Just like with my No-Churn Peach Hibiscus ice cream, use only organic hibiscus. As with any food, herb, or plant, please use hibiscus with caution. Or if you are nursing or pregnant, then this recipe is not intended for you, as it is not recommended due to adverse effects.

Hibiscus Lemon Tea

Recipe by Julie @ Sweet and Spicy Monkey
A refreshing blend of hibiscus, lemon, and chai tea.
Prep time: 15 minutes
Cook time: 10 minutes
Total time: 70 minutes
Yield: 3 and 1/2 quarts
Ingredients
  • 3 Tablespoons organic hibiscus flowers, dried
  • 8 cups water
  • 5 cups chai tea
  • 1 cup lemon juice
  • 3 and 1/2 cups Stevia in the raw
Directions
  1. Add 1 and 1/2 cups of water and hibiscus flowers into a small sauce pan. Over medium heat, bring to a boil. Once water starts boiling, remove from heat and let sit for 45 minutes.
  2. In a separate saucepan, add 5 and 1/2 cups (a little more than 5 cups to allow for evaporation) of water into a medium to large saucepan. Place 2 to 3 chai tea bags in water and bring to a boil. Once water starts to boil, turn off heat and let sit until room temperature.
  3. Meanwhile, add lemon juice, remaining 6 and 1/2 cups of water, and Stevia in the raw into a large pitcher. Place in refrigerator until hibiscus and tea are ready.
  4. After hibiscus sits for 45 minutes, using a fine mesh strainer placed over pitcher or a separate large bowl, pour hibiscus water through strainer. Use a wooden spoon to mash excess water out of remaining hibiscus flowers.
  5. If using a separate bowl for straining hibiscus, pour strained hibiscus water into pitcher with other ingredients.
  6. Remove tea bags from tea and pour into pitcher.
  7. Place pitcher into the refrigerator and let cool.
  8. Best served chilled over ice.

*Helpful Hints*
 
- Save the hibiscus flowers to decorate your ice cubes for this drink. In small bowl add remaining hibiscus flowers and about 1 cup of water, stir together. Pour into ice cube molds, sprinkling hibiscus flowers into each cube mold and place in freezer. Serve these ice cubes in your Hibiscus Lemon Tea for a decorative look.
 
All content and images are property of Sweet and Spicy Monkey. Please do not reprint this content without my permission. If you wish to include this recipe on your site, please re-write in your own words and use your own photographs and link back to this post for original recipe.
Follow Julie's board Sweet and Spicy Monkey on Pinterest.

Shared with: Savoring Saturdays

Monday, July 20, 2015

Skinny Frozen Strawberry Lemonade


I told y'all last week that I wasn't through with my lemon love! After making my ginormous batch of Skinny Lemonade, I started looking at different ways to enjoy it. That's when I came across a copycat Chick-fil-A's Frosted Lemonade recipe.

I have to admit, I don't eat fast food. I may sneak off to Subway for a sandwich once in a while when I don't feel like cooking (gasp! Yes that happens to me!). And I can't even remember the last time I ate one.

I stay away (far away) from places like McDonalds, Wendy's, Burger King, and even Chick-fil-A. The reason being is they all serve processed foods and most of it is fried. I try to stay away from that sort of thing.


Which probably explains why I've never heard of a frosted lemonade. What an ingenious idea this is! Taking one of summers most favorite beverages, lemonade, and adding ice cream to it! Simply delicious!

So I got an idea to add frozen strawberries to my Skinny Lemonade and add ice cream (no sugar added version), to make this Skinny Frozen Strawberry Lemonade. All the creaminess of an ice cream shake without all the sugar and calories.


So go ahead, make one for yourself and savor a few of summer’s favorites in one delicious drink.

Skinny Frozen Strawberry Lemonade

Recipe by Julie Murphy
A frozen drink combining a few of summer's favorites, lemonade, strawberries, and ice cream.
Prep time: 5 minutes
Cook time: 0
Total time: 5 minutes
Yield: 1 tall glass or 2 small child's cups
Ingredients
  • 1 cup lemonade
  • 1 and 1/2 cups frozen strawberries
  • 3 scoops vanilla ice cream (with no added sugar)
Directions
  1. Combine lemonade and frozen strawberries into a high speed blender. Blend until mixture is liquefied, no more strawberry chunks.
  2. Add in vanilla ice cream and blend until mixture is smooth.
  3. Pour into a tall glass and enjoy!

Inspired by ~ Chick-fil-A's Frosted Lemonade.
 
All content and images are property of Sweet and Spicy Monkey. Please do not reprint this content without my permission. If you wish to include this recipe on your site, please re-write in your own words and use your own photographs and link back to this post for original recipe.
Follow Julie's board Sweet and Spicy Monkey on Pinterest.

Thursday, July 16, 2015

Lemon Honey Granita


With the summer heat increasing and no chance of a cool change coming anytime soon (hurry up Fall), my lemon love is coming on strong. For those of you that didn't notice, this is my second lemon recipe this week! Funny thing is, I made this before my Skinny Lemonade. It just took me until now to post it.

This Lemon Honey Granita speaks for itself and you're either going to love it or not. Which means if you don't like lemons, then you can just stop right here. And I don't think we can be friends either.

Because as all of you know, that little tart yellow fruit is one of my favorite foods to use, whether in cooking or baking. Lemons are one of my all-star foods!

Now there's not much I can really say about this Lemon Honey Granita.
  • it's cold (always a good thing in the summertime)
  • it's lemony (always a plus in my book!)
  • and it has a sweet honey flavoring that blends well with the tartness of the lemons.
Plus it's made with vodka. You can never go wrong when you add a little booze to your Granita!

Blend that all together and you have a refreshingly light treat for a hot summer day. Perfetto!


Just a little note, you ain't seen the last of my lemon love!

Lemon Honey Granita

Recipe by Julie Murphy
A refreshingly sweet lemon Granita infused with vodka to help you keep your cool during the summer months.
Prep time: 5 minutes
Cook time: 5 minutes
Total time: 10 minutes (not including freeze time)
Ingredients
  • 1 cup Lemon water*
  • 1 cup lemon juice, freshly squeezed
  • 1 cup water
  • 1 cup honey
  • 1/2 cup vodka
Directions
  1. Add 1 cup of plain water and honey to a non-reactive small saucepan. Heat over low to medium heat until honey is dissolved into water. Remove from heat.
  2. In a large bowl, combine lemon water, lemon juice, vodka, and heated honey water. Stir together.
  3. Pour into a freezer proof container, a bread loaf pan works great for this.
  4. Place into the freezer, being careful not to spill contents.
  5. After 1 hour, remove from freezer and check to see if ice crystals have started to form around the edges. If so, take a fork, stir the mixture, scraping the ice crystals to the center of the pan.
  6. Replace back into the freezer, checking about every 30 to 45 minutes, stirring to help break up large ice crystals. Placing back into the freezer.
  7. Repeat above steps until you have fine crystals of Granita. This usually takes about 6 to 7 more times of breaking up mixture with fork, depending on your freezer settings.
  8. Let freeze overnight. You can even repeat above steps after mixture sets overnight.
  9. Serve immediately when ready, as mixture may melt quickly. To help prevent rapid melting, you can always dish out ahead of time into serving cups and place into freezer until ready to serve.
  10. Garnish with lemon zest or fresh sprigs of peppermint leaves.

*Helpful Hints*
 
- Lemon water is made by placing freshly washed lemons into a jar of water and letting it sit in the refrigerator up to 2 to 3 weeks, and then using the water for this Granita. You know the Lemon water is ready to use when it has a yellowish tint to it.
 
All content and images are property of Sweet and Spicy Monkey. Please do not reprint this content without my permission. If you wish to include this recipe on your site, please re-write in your own words and use your own photographs and link back to this post for original recipe.
Follow Julie's board Sweet and Spicy Monkey on Pinterest.

Shared with: Savoring Saturdays

Tuesday, July 14, 2015

Skinny Lemonade


It's hot out here in Georgia. Now I know out West, y'all think 95 degrees here in Georgia is nothing compared to your hot summer days of 112 and up. However, you have to remember that we have this thing called humidity out here. And add that humidity factor in and our measly 95 degrees shoots up another 5 to 10 degrees.

It's like opening your door and walking into an outdoor sauna. Those clean dry clothes you put on for work 5 minutes ago are now finding themselves drenched with sweat, sticking to your now wet body, and you feel like you can't breathe because of the stifling heat. And we're supposed to get up to 100 degrees this week!

So when Mother Nature decides to turn up the heat, I find myself reaching for this Skinny lemonade. It's a sip of refreshment on a hot summer day, without all the sugar calories.


Lemonade is such a simple drink to make with freshly squeezed lemons, water, and Splenda. That's it! And you can vary the Splenda and water depending upon you're taste. If you like your lemonade a little tart, add less Splenda. If you prefer your lemonade a little sweeter, add a little more water and Splenda.

You can add a little pulp to your lemonade like I do. Or you can add other fruit juices to your lemonade like cherry, orange, or watermelon. It's so easy to customize this drink to your individual taste.

And the best part about it, is the Splenda doesn't sink to the bottom like sugar, so you're guaranteed with a sweet lemon taste in every sip. Ahhh, refreshing!

I'm going to go change into some dry clothes now...

Skinny Lemonade

Recipe by Julie Murphy
A refreshingly sweet sugar-free alternative to the classic lemonade drink.
Prep time: 5 minutes
Cook time: 2 minutes
Total time: 7 minutes
Yield: 3 and 1/2 quarts
Ingredients
  • 10 cups water
  • 3 cups lemon juice, freshly squeezed
  • 2 and 1/2 cups Splenda (you can add 1/2 cup more if you like it sweeter)
Directions
  1. In a glass measuring cup, add 2 cups of water.
  2. Place in the microwave and heat for 1 to 2 minutes.
  3. Remove from microwave and stir in Splenda.
  4. In a large pitcher, add remaining water and heated Splenda water. Mix together.
  5. Add in lemon juice and stir.
  6. Let chill in the refrigerator for at least 4 hours and serve in a tall glass, with or without ice cubes.
  7. Garnish with lemon slices or mint leaves.

All content and images are property of Sweet and Spicy Monkey. Please do not reprint this content without my permission. If you wish to include this recipe on your site, please re-write in your own words and use your own photographs and link back to this post for original recipe.
Follow Julie's board Sweet and Spicy Monkey on Pinterest.

Shared with ~ Freedom Fridays with All My Bloggy Friends #89

Wednesday, May 20, 2015

Raspberry Lemon Panna Cotta with Raspberry Coulis


When the Daily Meal and Driscoll's asked me to use raspberries in a dish, I couldn't wait to make something yummy. I love fresh berries during the summer - strawberries, blackberries, blueberries, and raspberries. I love them all. I know it's not summer yet but it's warm and sunny outside and that's good enough for me!


And did you know that raspberries are good for your heart? That's right, the American Heart Association has certified raspberries as heart healthy because they have the flavonoids quercetin and gallic acid, which aid in the prevention of heart diseases by helping to keep the heart healthy.

Plus a one cup serving of raspberries has only 4 grams of sugar, which makes these little red berries even more scrumptious to eat! And berries make the best kind of desserts during the warmer months with their natural sweetness that comes from being kissed by the sun.

I have to admit, it wasn't that difficult to figure out what I was going to make with raspberries.


You know that feeling...the one when you're in love and you want to spend every waking moment with each other? Yes, that warm and fuzzy all over feeling. Well that's the way I feel about Panna Cotta, my new love!

After my Lemon Panna Cotta a couple days ago, I just couldn't get enough and found myself thinking about it day and night. I was obsessed with it. I knew I had to do something and that's how this Raspberry Lemon Panna Cotta came about.


A combination of sweet and tangy lemons mixed with the fresh sun kissed taste of raspberries all in one decadent creamy dessert. It's a match made in Heaven!

Raspberry Lemon Panna Cotta

Recipe by Julie Murphy
A lightly sweetened, chilled Italian raspberry and lemon treat for summer.
Prep time: 5 minutes
Cook time: 10 minutes
Total time: 25 minutes
Yield: 4 servings
Ingredients
  • 1 cup heavy cream
  • 1 cup half and half
  • 1/4 cup honey
  • 1/2 teaspoon vanilla extract
  • 1/2 teaspoon raspberry extract
  • 1 package (6 ounces) Driscoll's raspberries, rinsed
  • 1 package unflavored powdered gelatin
  • 3 Tablespons cold water
Cooking Directions
  1. Add raspberries to food processor or blender and puree.
  2. Place pureed raspberries into a fine strainer, place a clean bowl under strainer, and using a spatula, gently push down on raspberry puree to help remove seeds from raspberries. You should end up with about 3 to 4 Tablespoons of strained raspberry puree. Don't worry if it still has a few seeds. If too many seeds push through, you can always repeat straining process. Set strained raspberry puree aside.
  3. In a medium saucepan, add heavy cream and half & half with honey. Heat over low to medium heat, stirring constantly with a wooden spoon, until honey is dissolved, about 7 to 10 minutes. You want to warm cream blend, not boil it. You should be able to stick a finger into the cream to test warmth.
  4. Remove from heat and mix in vanilla, raspberry extract, strained pureed raspberries to cream and honey blend. Cover and set aside.
  5. In a large mixing bowl, add cold water. Sprinkle powdered gelatin over cold water. Let stand for 5 to 10 minutes as gelatin blooms.
  6. Meanwhile, remove serving cups with Lemon Panna cotta from refrigerator and uncover cups/and or bowls. Set aside.
  7. After gelatin blooms, slowly add in warm raspberry cream blend, stirring to help dissolve all of gelatin. Continue to add in cream mixture and stirring.
  8. After gelatin is completely dissolved, pour or ladle into prepared cups and/or bowls.
  9. Place in refrigerator and let chill for at least 4 hours before serving.
  10. If serving in cups/bowls, top with lemon curd, raspberry coulis, and fresh raspberries.
  11. If unmolding out of cups/bowls, gently run a clean knife around the edges of the Panna Cotta and turn upside down over serving plate. Panna Cotta should slide out. Top same as if serving in cups or bowls with lemon curd, raspberry coulis, and fresh raspberries.

Recipe for Lemon Panna Cotta can be found here. Recipe for Raspberry Coulis below. Recipe for Lemon Curd here.

When making this Raspberry Lemon Panna Cotta, prepare Lemon Panna Cotta as directed, filling serving cups and/or bowls halfway. Place in refrigerator for at least 4 hours to chill before adding Raspberry Panna Cotta. Chill for another 4 hours before serving.


Raspberry Coulis

Recipe by Julie Murphy
A quick and easy way to make Raspberry Coulis, a sweetened raspberry sauce used for decoration of desserts.
Prep time: 5 minutes
Cook time: 25 seconds
Total time: 6 minutes
Yield: 1 and 1/2 Tablespoons
Ingredients
  • 3 ounces fresh raspberries, rinsed
  • 1 teaspoon honey
Cooking Directions
  1. Using a food processor, puree raspberries.
  2. Place pureed raspberries into a fine strainer. Place a clean, small bowl under the strainer. Using a spatula or back of a wooden spoon, gently press down on raspberry puree and push through the strainer. Repeat process until seeds have been removed from raspberries. Its ok if a few seeds are still in the strained raspberry puree. You will have to use a clean spoon to scrape the strained raspberries off of the bottom of the strainer. You should end up with about 1 and 1/2 Tablespoons of strained raspberries.
  3. Add honey to strained, pureed raspberries and mix together.
  4. Place bowl in microwave for 10 seconds on High setting. After 10 seconds, remove bowl and stir.
  5. Place bowl back into microwave and cook for another 10 to 15 seconds. Watch carefully as you do not want raspberries to boil or overcook. You just want to heat up. Remove from microwave and stir together.
  6. Let cool to room temperature and then place bowl into refrigerator for at least 15 to 30 minutes before using.

Disclaimer ~ I am not employed by Driscoll's and was not paid nor compensated for this post. All ideas and opinions are my own.
 
All content and images are property of Sweet and Spicy Monkey. Please do not reprint this content without my permission. If you wish to include this recipe on your site, please re-write in your own words and use your own photographs and link back to this post for original recipe.
Follow Julie's board Sweet and Spicy Monkey on Pinterest.

Sunday, May 17, 2015

Lemon Panna Cotta


Yes, a lemon recipe. However, this isn't just your ordinary lemon recipe. This is an easy to make recipe that looks elegant and is perfect for any get together. It's lightly sweet and cool on the tongue and not to mention looks like you spent all day making it.

Panna Cotta is a classic Italian dessert. It reminds me of a cross between custard and Jello, a sweet and creamy jiggly dessert.


Traditionally, Panna Cotta is made with cream, honey, egg whites, and a gelatinous form of cooked fish bones. Lucky for you (and me) home cooks have simplified the recipe by using unflavored gelatin so you can make this under 30 minutes.

It's a most versatile dessert as you can make it with heavy cream, half and half, buttermilk, coconut milk, almond, or cashew milk. Plus you can use your choice of sweetener or flavor you desire.


Believe it or not, I never had Panna Cotta before, let alone made it. I stumbled upon it while looking for semifreddo recipes, another recipe I've never had or made. Semifreddo is (still) on my bucket list. I hope to make it sometime this year.

Back to this Panna Cotta, I found a basic Panna Cotta recipe by David Lebovitz, added a little lemon extract, lemon juice and zest, a little dollop of homemade curd, blackberry or lemon (because you can never have enough lemon) topped it off with a fresh blackberry, and Wa-la!

It really is effortless, yet looks so elegant, and everyone will love it. Your family and friends will be wowed by your skills of perfecting this Italian dessert ( even though you and I know this is your first time making it!).


I think I'm in love......with this Lemon Panna Cotta!

Lemon Panna Cotta

Recipe by Julie Murphy
A lightly sweetened, chilled lemon treat for summer.
Prep time: 5 minutes
Cook time: 10 minutes
Total time: 25 minutes
Yield: 8 servings
Ingredients
  • 2 cups buttermilk, full fat
  • 2 cups buttermilk, reduced fat
  • 1/2 cup honey
  • 1 teaspoon vanilla extract
  • 1 teaspoon lemon extract
  • 2 Tablespoons fresh lemon juice
  • 1 lemon, zest from
  • 2 packets unflavored powdered gelatin
  • 6 Tablespoons cold water
Cooking Directions
  1. In a medium saucepan, add buttermilk and honey. Heat over low to medium heat, stirring constantly with a wooden spoon, until honey is dissolved, about 7 to 10 minutes. You want to warm buttermilk not boil it. You should be able to stick a finger into the buttermilk to test warmth.
  2. Remove from heat and mix in vanilla, lemon extract, lemon juice, and lemon zest to buttermilk and honey blend. Cover and set aside.
  3. In a large mixing bowl, add cold water. Sprinkle powdered gelatin over cold water. Let stand for 5 to 10 minutes as gelatin blooms.
  4. Meanwhile, prepare serving cups and/or bowls by lightly spraying with an unflavored cooking spray or oil. Wipe off excess with a clean paper towel.
  5. After gelatin blooms, slowly add in warm buttermilk blend, stirring to help dissolve all of gelatin. Continue to add in buttermilk mixture and stirring.
  6. After gelatin is completely dissolved, pour or ladle into prepared cups and/or bowls.
  7. Place in refrigerator and let chill for at least 4 hours before serving.
  8. If serving in cups/bowls, top with lemon curd, blackberry curd, or fresh fruit.
  9. If unmolding out of cups/bowls, gently run a clean knife around the edges of the Panna Cotta and turn upside down over serving plate. Panna Cotta should slide out. Top same as if serving in cups or bowls with lemon curd, blackberry curd, or fresh fruit.


*Helpful Hints*

- Recipes for Lemon curd can be found here.

- Recipe for Blackberry curd can be found here.

Adapted from David Lebovitz basic Perfect Panna Cotta Recipe.

All content and images are property of Sweet and Spicy Monkey. Please do not reprint this content without my permission. If you wish to include this recipe on your site, please re-write in your own words and use your own photographs and link back to this post for original recipe.
Follow Julie's board Sweet and Spicy Monkey on Pinterest.

Thursday, May 7, 2015

Lemon Blackberry Cake #whenwebake


Disclaimer ~ I was provided a coupon for a free Country Crock spread for this recipe. All thoughts and opinions are my own. #whenwebake

I was asked by my friends at The Daily Meal and Country Crock  to create a recipe for Mother's Day. And since my mom is the one who inspired me to cook and bake, this sounded like such a great idea to me. I could not pass it up!

I grew up with Country Crock spread when my mom decided it was time for us to eat healthier and not use so much butter. Country Crock is still my go-to butter substitute because it tastes so much like real butter, but easier to spread and not as many calories or fat. Did you know that Country Crock has 65% less saturated fat and 20% less calories than butter? That’s right, Country Crock has 80 calories and 8 grams of fat, with 2.5 grams being from saturated fat. Compared to butter, which has 100 calories and 11 grams of fat, with 7 grams of saturated fat per serving. And Country Crock still has the buttery rich flavor of butter and spreads easily, even when cold.


Believe it or not, my mom also loves the sweet, tangy taste of lemon treats (I guess I really am my mom's daughter {smile}). And with my lemon love back and going strong, this cake was a no-brainer recipe for a Mother’s Day brunch. I mean what better way for my mom to celebrate her Mother's Day than with some sort of lemony treat. That's why this Lemon Blackberry Cake is perfect for her upcoming special day.

Now my mom resides in California while I'm over here in Georgia and she won't be able to enjoy this cake with me. However, with the miracle of the Internet, she can make her own cake with my recipe here, as you can too.

I've combined lemon whipped cream and a homemade blackberry curd sandwiched between two slices of Angel food cake, covered with a lemon cream cheese buttercream frosting and topped with fresh blackberries. The blackberries compliment the lemon flavors.

This cake is so easy to make. Especially since I used liquid egg whites instead of separating the egg yolks from the whites, which can be messy and leave you with twelve egg yolks. I was also surprised with how nice the liquid egg whites whipped up with stiff peaks! And you can even make the cake a day ahead or use a store bought Angel food cake if you're crunched for time.

I know my mom is going to love a big slice of this Lemon Blackberry Cake on Mother's Day.


This cake is also perfect for any Spring or Summer get together with its fresh fruity flavors that are reminiscent of sunny days.

Homemade Angel Food Cake

Recipe by Julie Murphy
A light and fluffy homemade Angel food cake made with liquid egg whites so you can save time and less mess in the kitchen from trying to separate the eggs yourself.
Prep time: 10
Cook time: 35
Total time: 2 hours (including cooling time for cake)
Ingredients
  • 1 and 1/3 cups granulated sugar
  • 1 cup cake flour
  • 1/4 teaspoon sea salt
  • 2 and 1/4 cups liquid egg whites
  • 1/3 cup warm water
  • 1 teaspoon vanilla extract
  • 1 and 1/2 teaspoons cream of tartar
Cooking Directions
  1. Preheat oven to 350F degrees.
  2. Spray Angel food cake pan or Bundt pan with non-stick cooking spray. Set aside.
  3. Place sugar into a food processor and blend until fine. Set aside.
  4. In a medium bowl, sift together cake flour, salt, and half of fine sugar. Set aside.
  5. In a large bowl, egg whites, warm water, vanilla, and cream of tartar. Using a hand whisk, gently mix together until blended. Attach bowl to stand mixer and using the whisk attachment, whip ingredients together while slowly adding in remaining half of sugar. Beat until egg white mixture starts to form medium peaks.
  6. Sprinkle a small amount of cake flour blend over the top of egg whites and blend on low speed. Continue to add in flour mixture, a little at a time, while gently whipping egg white mixture, making sure all of cake flour blend is evenly combined with egg white mixture.
  7. Using a spatula, gently pour into prepared pan.
  8. Place into preheated oven and bake for 35 minutes or until top is golden brown. Also make sure cake is evenly baked throughout by inserting a clean, sharp knife into the center and pulling back out. Knife should come out clean.
  9. To cool cake, invert over wire rack and cool upside down.
  10. Once cake is completely cooled, gently run a clean knife around the edges (without scraping cake pan) to help loosen cake, and remove pan.
  11. To make the cake, slice in half with a large, sharp knife so you have a top and a bottom layer. Remove the top and set aside.
  12. Layer bottom half of cake generously with blackberry curd. Gently layer lemon whipped cream over the blackberry curd. Place top half gently over the lemon whipped cream.
  13. Generously apply lemon cream cheese buttercream frosting over cake, covering all exposed sides and top. It's ok if it starts to drip down the sides. Place fresh blackberries on top.
  14. Cover and refrigerate until ready to serve. Store covered in the refrigerator for up to 1 week.

Recipe for Lemon Whipped Cream, and Lemon Cream Cheese Buttercream Frosting below. Link for Blackberry Curd recipe below.


Lemon Whipped Cream

Recipe by Julie Murphy
A deliciously light and fluffy lemon whipped cream.
Prep time: 5
Cook time: 0
Total time: 15
Yield: 8 ounces
Ingredients
  • 1 cup heavy cream
  • 8 Tablespoons powdered sugar
  • 3 Tablespoons lemon juice, freshly squeezed
Directions
  1. Add all ingredients into large bowl of stand mixer and whip with whisk attachment until stiff peaks form, about 8 - 10 minutes.
  2. Using a spatula, pour into an 8 ounce container, cover, and refrigerate until ready to use.


Lemon Cream Cheese Buttercream Frosting

Recipe by Julie Murphy
A deliciously lemon cream cheese buttercream frosting.
Prep time: 5
Cook time: 0
Total time: 10
Ingredients
  • 1 - 8 ounce package cream cheese, room temperature
  • 1/4 cup Country Crock spread
  • 4 Tablespoons lemon juice, freshly squeezed
  • Zest from 1 lemon
  • 1 teaspoon vanilla extract
  • 1 teaspoon lemon extract
  • 5 cups powdered sugar
Cooking Directions
  1. Place cream cheese and Country Crock spread into a large bowl of stand mixer. Gently blend together until mixed.
  2. Add in lemon juice, lemon zest, vanilla, and lemon extract. Beat until smooth and fluffy.
  3. Blend in powdered sugar in 2 separate additions. Beat until creamy.
  4. Pour into a bowl and cover. If not using immediately, refrigerate until ready to use.
  5. After refrigerating, let frosting warm to room temperature before frosting cake so it spreads easily without tearing cake.
  6. Can store any leftover frosting in a covered container in the refrigerator up to 2 weeks.


Recipe for Blackberry Curd can be found here.

Additional recipes from Country Crock #whenwebake can also be found on Facebook, Twitter, and Pinterest.
Country Crock information obtained from - Country Crock's website

All content and images are property of Sweet and Spicy Monkey. Please do not reprint this content without my permission. If you wish to include this recipe on your site, please re-write in your own words and use your own photographs and link back to this post for original recipe.
Follow Julie's board Sweet and Spicy Monkey on Pinterest.

Shared with: Crafty and Delicious Party, Foodie Friends Friday Linky Party #146, Munching Mondays #90

Saturday, May 2, 2015

Lemon Curd


My love for lemons is returning now that the sun is shining and the flowers are in bloom. It never was really gone, just sitting there on the back burner because I didn't want y'all to think "another lemon recipe, geesh, get over it already."

So I took a little break and made other foods. Of course I feel the same way about coconut. Just give me endless lemons and coconut and I will be a happy girl! Oh all the recipes I still have to try with my two loves, lemon and coconut.

Which brings us to this recipe, Lemon Curd. I've seen this recipe everywhere and I've been wanting to make it but just never have....until now. And I've got to ask myself "what in the world was I thinking to put off this recipe for so long?" I mean yummy, sweet, lemon curd reminds me of a lemon pudding, it's just thicker and has a little more zing.

So if you love lemon pudding like I do, then you're going to fall hard for lemon curd. The best part about it (other than being lemon) is you can use it for many things from putting it on scones to using it in tarts, cupcakes, and even cakes. It's so versatile and brings such a sweet lemony taste to anything you put it on. Although my favorite is on a spoon straight out of the jar.

Hmm, maybe that will be my next recipe, lemon curd on a spoon! Ha!

And I did all the hard work here to let you know if there is any difference between using butter or margarine in your lemon curd. I used the exact same recipe for both, Martha Stewart's Lemon Curd recipe, using butter in one batch and margarine in the other.

The reason I chose Martha Stewart's recipe is because everything she makes is delicious. Plus this is an easy recipe to make with only five ingredients and you can make it in under 15 minutes. How easy is that?


Both batches had a nice, thick custard texture. Believe it or not, the only difference I could tell was the margarine batch had more of a buttery flavor to it. While the butter batch had more of a sweet and tangy lemon flavor.

Both were delicious and depending on what kind of flavor you're going for, either one would work great for what you want to use it for. The main decision on which one you want to make depends all on what you have available to you at the time you decide to make your own batch of lemon curd.

If you get a chance to make both batches, let me know which one you like better, the butter version or the batch made with margarine.

Lemon Curd

Comparing the difference between butter and margarine in homemade Lemon curd.
Prep time: 5
Cook time: 7
Total time: 15
Yield: 1 cup
Ingredients
  • 3 Egg yolks, strained
  • Zest from 1 Lemon
  • 1/4 cup fresh lemon juice
  • 6 Tablespoons granulated sugar
  • 4 Tablespoons cold, unsalted butter, cut into small pieces (can also use margarine)
  • 1 wooden spoon
Cooking Directions
  1. In a small saucepan, add yolks, lemon zest, lemon juice, and sugar. Whisk together to blend.
  2. Over medium heat, stir constantly with a wooden spoon. If mixture starts boiling, turn heat down. Also making sure to scrape sides and bottom of pan when stirring. Cook until mixture coats back of wooden spoon, about 5-7 minutes.
  3. Remove pan from heat and gradually add in butter pieces, stirring well until all butter pieces are melted. Mixture should have a smooth consistency.
  4. Using a spatula, pour mixture into a small bowl. Place plastic wrap directly on the surface of the curd to help prevent a skin from forming on the top. Wrap tightly.
  5. Place in refrigerator and let chill and firm up at least one hour before using. Transfer into an airtight container for storage. Store up to 2 weeks in the refrigerator.

All content and images are property of Sweet and Spicy Monkey. Please do not reprint this content without my permission. If you wish to include this recipe on your site, please re-write in your own words and use your own photographs and link back to this post for original recipe.