Sweet and Spicy Monkey has moved to: www.sweetandspicymonkey.com

Showing posts with label paleo. Show all posts

Sunday, February 21, 2016

No-Bake Granola Bars


Recently I attended a Facebook Q&A (well, I logged onto and submitted a question) for David Lebovitz on Sur La Table's Facebook page. Sur La Table's Q&A gives fans a chance to ask questions to some of their favorite food chefs. And I was lucky enough to see this one for David Lebovitz coming up.

You know where you see something coming up and you get all excited about it? And then the day comes around and you've totally forgotten about it? Yea, that happened to me on this Q&A. Luckily, I still had 10 minutes left in it, so I thought of a quick question to ask.

One that's been on my mind (especially after my Swiss Cake Roll fail x 2, thank you very much) is does he have one recipe that he finds a challenge. So that's the one question I submitted.

And do you know what the answer was for this famous pastry chef and cookbook author? Granola bars! Yes, you read that right, granola bars. A healthy granola bar gives David Lebovitz troubles.


This made me feel good because if you follow me, you know the troubles I've had with the Swiss Cake Roll. Although after the last one, I learned that you have to make the cake by scratch because box cake mixes are more crumble-prone than homemade sponge cakes. Something I was unaware of at the time. I've yet to try it after the last fail because I got so frustrated over it.

But to know that David Lebovitz has troubles with granola bars (of all things) makes me feel good. Sorry. Not Sorry. David.

Which got me thinking of the granola bars I made last year and never got to share with y'all. Yes, I held out a recipe from you. Well, not intentionally, just forgot.

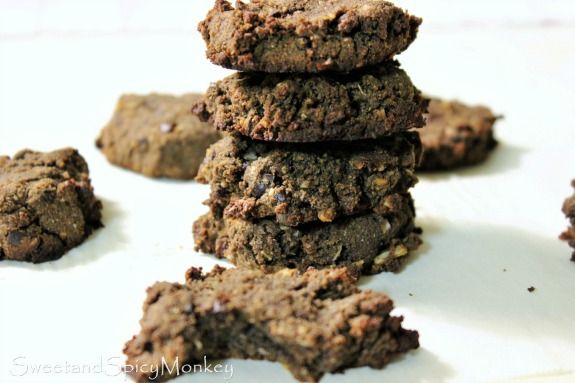
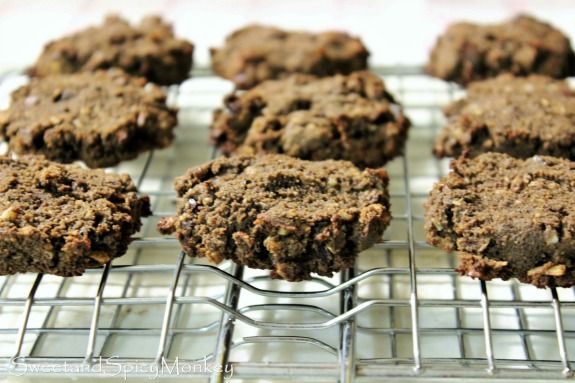
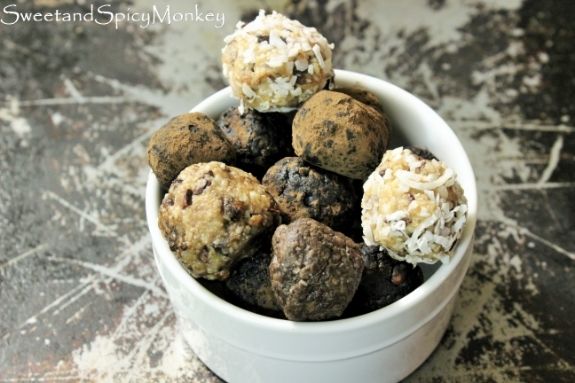
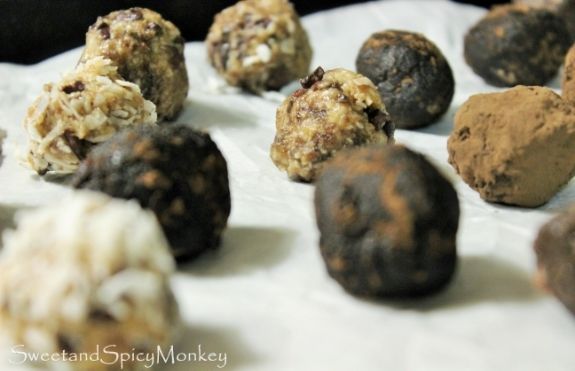
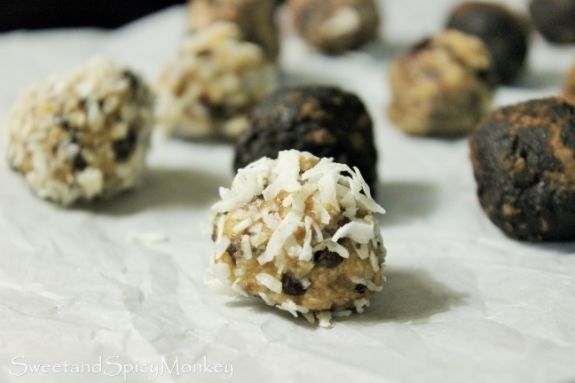
These No-Bake Granola Bars are so yummy, you'll forget they're good for you too! I've packed them full of coconut, chia seeds, cacao nibs, and dried cherries. And to help sweeten them, I used a combination of honey and dates.


The best part is you don't need to bake anything and they're ready to eat immediately. Although, I would let them chill for a few hours so the honey and peanut butter can set since they might be a little crumbly if eaten right away. That's the "glue" that holds them together.

Of course, you can also put chopped peanuts, almonds, or pistachios instead of the chia seeds, but you might want to add a little more honey or peanut butter (1 to 2 Tablespoons extra) because that might throw off the wet to dry ratio.

But don't let the chia seeds throw you off thinking these bars won't have any crunch to them. The chia seeds, along with the cocao nibs, gives a nice crunchy texture to these granola bars.


You can also substitute for the dried cherries, using raisins, dried cranberries or blueberries. It's a very customizable recipe so try what you like and let me know how they turn out.

Now about that Swiss Cake Roll recipe....


No-Bake Granola Bars
Recipe by Julie Murphy @ Sweet and Spicy Monkey
Deliciously healthy & easy to make granola bars for on the go breakfast or snacking.
Prep time: 10 minutes
Total time: 15 minutes
Ingredients
  • 3 cups Old Fashioned Oats, uncooked
  • 1 and 1/2 cups creamy peanut butter
  • 1/2 cup honey
  • 1 cup unsweetened coconut flakes
  • 5 Medjool dates, diced
  • 3/4 to 1 cup dried cherries
  • 1/2 cup cocao nibs
  • 4 Tablespoons chia seeds
Directions
  1. Prepare 8" x 11" pan by wiping down with coconut oil. Wipe any excess off with a clean, dry paper towel. Set aside.
  2. Add all ingredients into a large mixing bowl and stir together, making sure peanut butter and honey coat all ingredients.
  3. Pour mixture into prepared pan and press down firmly with palm of hand.
  4. Cover pan and let chill in refrigerator so peanut butter and honey can set.
  5. Can store in covered pan in refrigerator for up to 1 week. But they won't last that long!
 *Helpful Hints*     
- You can use a smaller pan, but that will make bars thicker. Same goes if you want to use a larger pan, bars will be thinner in size. Bars shown are 1" thick using an 8" x 11" pan.

- You can use semi-sweet or dark chocolate chips instead of cocao nibs in this recipe.

- You can use flaked sweetened coconut instead of unsweetened coconut flakes.

All content and images are property of Sweet and Spicy Monkey. Please do not reprint this content without my permission. If you wish to include this recipe on your site, please re-write in your own words and use your own photographs and link back to this post for original recipe.
Follow Julie's board Sweet and Spicy Monkey on Pinterest.

Thursday, November 19, 2015

Harvest Salad


I just love the colors of this salad! And yes it is still considered a salad, even though there's no lettuce or green leafy stuff in it.

According to Wikipedia (the world’s source for all information besides Google), a salad is "a various mixture of raw and cooked vegetables seasoned with a vinegar", balsamic vinegar reduction in this case.

So yes, this is a salad by those terms. And what a wonderful salad it is!

I've combined butternut squash, sweet potatoes, beets, French green beans, Brussels sprouts, persimmons, pomegranate seeds, and walnuts. As if that wasn't enough, I've also added…

It even looks beautiful without the blueberries!

A drizzling of balsamic vinegar reduction (homemade, of course!) over all those wonderfully healthy foods and a handful of fresh blueberries warmed with honey to top it all off with!

The result is a lightly sweet, healthy, and beautifully colored salad that will be the centerpiece of your Thanksgiving table.


A perfect dish for all the vegans (and non-vegans) who will be attending your home on Thanksgiving Day! Plus, it’s also gluten-free, soy-free, and paleo friendly.

I've included directions for baking the butternut squash, sweet potato, beet, French green beans, Brussels sprouts, and warmed blueberries below. Plus, I've listed a link for making Balsamic vinegar reduction in the helpful hints section below the cooking directions.

One of the best things about this salad, especially if you're making it for Thanksgiving, is you can prepare the butternut squash, sweet potatoes, beets, and pomegranate a day or two ahead to save you some time. Then before you serve it, just pop those ingredients in the microwave to warm them up again and finish with the remaining ingredients.

You'll definitely want to wait to prepare the green beans, Brussels sprouts, and blueberries until it's time to serve them since they taste best right after preparing.

I hope you don't just make this salad only for Thanksgiving, as you can enjoy it anytime of the year for a healthy and flavorful meal or side dish.

Harvest Salad

Recipe by Julie Murphy
A healthy salad with a variety of Autumn fruit and vegetables. Paleo friendly, gluten-free, soy-free.
Prep time: 20 minutes
Cook time: 1 hour and 30 minutes
Total time: 2 hours (includes baking time for squash, sweet potato, and beet)
Yield: 4 servings
Ingredients
  • 1 butternut squash, roasted
  • 1 sweet potato, baked and cut into small chunks
  • 1 beet, baked
  • 1 bunch French green beans
  • 1 lb. Brussels sprouts
  • 1 Fuyu persimmon, cored and sliced
  • 1/4 cup pomegranate seeds
  • 1/4 cup walnuts, shelled
  • 1 cup fresh blueberries, rinsed and dried
  • 1 Tablespoon honey
  • 1 to 2 Tablespoons Balsamic vinegar reduction
  • 3 to 4 Tablespoons olive oil
  • sea salt & pepper
Cooking Directions
  1. Preheat oven to 400F degrees.
  2. Wash, rinse, and dry whole butternut squash, sweet potato, and beet.
  3. Pierce sweet potato a few times with a sharp knife. Wrap sweet potato in aluminum foil.
  4. Wrap beet in aluminum foil.
  5. Place whole butternut squash onto an ungreased cookie sheet.
  6. You can place sweet potato in a small pan or fit it onto cookie sheet with butternut squash.
  7. Place butternut squash, sweet potato, and beet into oven and bake for 55-60 minutes.
  8. While those are baking, open up pomegranate and remove seeds. Place seeds into an airtight container and store in refrigerator until ready to add into salad.
  9. Wash and rinse persimmon. Core and slice. Set aside.
  10. After butternut squash, sweet potato, and beet are done baking. It's time to prepare Brussels sprouts and green beans.
  11. To prepare Brussels sprouts, add water, sea salt, and 1 Tablespoon of olive oil to a medium sauce pan. Bring to a boil. Add in Brussels sprouts and cook for 5 to 8 minutes. Drain by pouring into a colander.
  12. Add Brussels sprouts back into pan, combine 1 to 2 Tablespoons of olive oil, 1 Tablespoon balsamic vinegar, 1/2 teaspoon black pepper, and 1/4 teaspoon sea salt. Gently mix together, coating all of the Brussels sprouts with oil vinegar mix.
  13. Place Brussels sprouts onto an ungreased cookie sheet and bake at 400F degrees for 15 to 20 minutes, or until lightly roasted. Check after 10 minutes.
  14. To prepare green beans, preheat oven to 425F degrees. Place a clean, ungreased cookie sheet into preheated oven for 10 minutes. Meanwhile, place green beans into a small bowl. Combine with 1 Tablespoon of olive oil, 1/4 teaspoon black pepper, and a dash of sea salt.
  15. Spread green beans evenly over cookie sheet and bake for 8 to 10 minutes.
  16. After butternut squash, sweet potato, and beet have cooled off, its now time to prepare them.
  17. For butternut squash, cut in half, remove seeds, and cut into small cubes. Place onto serving platter.
  18. For sweet potato, remove skin and cut into small cubes. Add to platter with butternut squash.
  19. To prepare beet, remove outside skin and slice or cut into small chunks. Add to platter.
  20. Add Brussels sprouts and green beans to platter mix.
  21. Arrange persimmon slices, pomegranate seeds, and walnuts throughout squash, sweet potato, beet, green beans, and Brussels sprouts arrangement on platter.
  22. Now its time to prepare the warm blueberries.
  23. Prepare a small frying pan with non-stick cooking spray. Heat over medium heat. Once warm, add 1 Tablespoon honey and fresh blueberries. Cook over medium to low heat for about 5 minutes until warm. Don't cook too long or blueberries will start to burst. After blueberries are warmed up, pour over other ingredients.
  24. Drizzle balsamic vinegar reduction over the top (or serve on the side) and serve.


*Helpful Hints*
 
- Link for making your own Balsamic vinegar reduction can be found here ~ How to Make Reduced Balsamic Glaze.

- I find it easier to bake the butternut squash as a whole because they are so difficult to cut before baking.

- If your oven cooks HOT, you might need to turn the butternut squash over after 30 minutes to prevent browning on one side.

- You can always double the ingredients to serve more people. Example is for 8 servings, double the ingredients, and so on. This salad has a very flexible amount of ingredients as you cannot go wrong with a little more or a little less of an ingredient.

All content and images are property of Sweet and Spicy Monkey. Please do not reprint this content without my permission. If you wish to include this recipe on your site, please re-write in your own words and use your own photographs and link back to this post for original recipe.
Follow Julie's board Sweet and Spicy Monkey on Pinterest.

Shared with: Savoring Saturdays

Wednesday, September 23, 2015

Beautiful Warm Sweet Peaches


Today you will find my recipe for Baked Peaches or better known by Ben as, "beautiful warm sweet peaches", over at The Online Grill.

I really do hope you get a chance to swing by Ben's site because he has a little bit of everything over there from benefits of eating dark chocolate to different ways you can enjoy bacon!

So hop on over to The Online Grill, take a browse, and tell Ben hello!

Follow Julie's board Sweet and Spicy Monkey on Pinterest.

Friday, August 28, 2015

Matcha Quinoa Granola


As the end of August nears, days start getting shorter, and the kids go back to school, it's only obvious that Fall is just around the corner. Wow, where did this year go? It feels like only yesterday when we were expecting snow and freezing temperatures.

Have I mentioned how much I love fall? If you didn't know yet, I absolutely L-O-V-E fall. I love everything about it. The cooler days, football season, the smell of spices like cinnamon, nutmeg, and cloves permeating from the kitchen. And most of all, the freedom to bake! Yes, actually being able to bake anytime I want without worrying about heating up the house. Baking freedom! Can I get a Woot! Woot!

This recipe I'm sharing with y'all is perfect for fall too. And it makes for a healthy start to your day as I've combined Matcha powder, quinoa, and chia seeds in my granola. Yes, quinoa in my granola.


I got the idea from a store bought granola I recently purchased. The quinoa gives the granola an extra little crunch.

A delicious and lightly sweetened homemade granola that's so much better tasting than the store bought types with their heavy sugar content. And you can always personalize it by adding dried fruit, chocolate chips, or sunflower seeds. Your imagination is the limit!

You and your family will also love the way your home smells when you make this granola. If you didn't know it already, baking smells have such a relaxing effect on people.


So go release some stress by getting busy in the kitchen with this easy homemade granola recipe. It will bring a smile to your face with that first bite. But not just because you know you're eating something healthy that you made, but because it also taste better than any granola you've ever brought home from the store.

Matcha Quinoa Granola

Recipe by Julie Murphy
An easy and healthy granola with Matcha powder, quinoa, and chia seeds for breakfast or snacking.
Prep time: 5 minutes
Cook time: 25 miinutes
Yield: 3 1/2 cups
Ingredients
  • 3 cups Old Fashioned oats
  • 2 Tablespoons organic brown sugar
  • 1/2 teaspoon cinnamon
  • 1/4 cup coconut oil
  • 1/2 cup cooked quinoa
  • 2 teaspoons Matcha powder
  • 1/4 cup pure Maple syrup
  • 2 Tablespoons chia seeds
  • dash pink Himalayan salt
  • 1/2 cup organic coconut flakes, unsweetened
  • 1/2 cup chopped pecans
Cooking Directions
  1. Preheat oven to 325F degrees.
  2. Prepare a cookie sheet by wiping down with a small amount of (your choice) coconut oil, sunflower oil, butter, or non-stick cooking spray. Wipe off any excess oil with a clean, dry paper towel. Doing this will help decrease any chance of burning your granola. Set prepared cookie sheet aside.
  3. In a large mixing bowl, combine oats, brown sugar, cinnamon, coconut oil, quinoa, Matcha powder, maple syrup, chia seeds, and salt. Mix well.
  4. Spread granola evenly over cookie sheet.
  5. Place into oven and bake for 20 to 25 minutes, stirring granola every 5 minutes. It's very important to stir granola every 5 minutes, otherwise you will end up with burnt granola (just sayin, not like it happened to me or anything).
  6. Remove from oven.
  7. Stir in chopped pecans and coconut. Allow to let cool completely, approximately 1 hour.
  8. Store in an airtight container.
  9. Can be used for breakfast cereal, mixed in with pancake mix, snacking, or as a topping for yogurt, ice cream, or fruit cobblers.

*Helpful Hints*

- Always add dried fruits, nuts, and seeds after granola comes out of the oven.

- You can always use sweetened coconut flakes, brown sugar, or sea salt instead of organic and unsweetened ingredients.

- You can leave out the chia seeds if you don’t like them.


All content and images are property of Sweet and Spicy Monkey. Please do not reprint this content without my permission. If you wish to include this recipe on your site, please re-write in your own words and use your own photographs and link back to this post for original recipe.


Monday, June 1, 2015

No Bake Coconut Cookies

There's this commercial I've been searching high and low for on the Internet but cannot find. Mainly because I can't even remember what it's for! Now I know what you're saying, "how can you be looking for something when you don't even know what it is?".

Well, I remember the commercial and the goofy husband in it since that's the part I wanted to show one of my friends because that goofy guy reminds me of a co-worker and I wanted to show him. But I cannot remember for the life of me what the commercial is for.

The commercial in question starts with a pregnant wife and a friend at a baby shower, talking about not knowing the gender of the baby. And she will find out when they cut the cake because it will either be pink for a girl or blue for a boy. And then the goofy husband walks out of the kitchen eating a cupcake and gives this silly grin all covered in blue frosting, totally clueless.

Yes, I remember the commercial clearly and can probably even act it out, but what it's promoting, I have no clue since I got so caught up in how much that goofy guy reminds me of a co-worker. Do you know which commercial I'm talking about? If so, please let me know down below in the comments so I can end this search and show my friend that I'm not making this up.

I did stumble upon something during my search for this commercial, a blog, Renegade Mothering, by Janelle Hanchett, also known as Renegade Mama. The post I read was about how much she despises gender reveal parties. It was totally hilarious and had me rolling on the floor with laughter. If you get a chance, you can link to it here. Be warned, she does use adult language.

But anywho, enough ramblings from me. I'm not making any gender colored cupcakes, cakes, or cake pops today. As a matter of fact, these sweet little treats I'm sharing with you today are neutral in coloring, but don't let that fool you as they are quite flavorful. Of course anything coconut is flavorful to me!


These cookies are a no bake cookie and are dairy free, gluten-free, egg free, and Paleo friendly. All that and easy to make too with no baking involved! How's that for a summer treat?

You can make these cookies under 15 minutes and either start munching right away or you can let them chill for 30 minutes to let them sit up a bit. They're great for a quick breakfast on the run, during your morning commute, between meals, or when you get a craving for sweets and don't want to indulge in something sinful.

Either way, they're easy and quick to make so you have more free time to go shopping or for some more sun time by the pool. Or to help me find that dang commercial!


No Bake Coconut Cookies

Recipe by Julie Murphy
These No Bake protein coconut cookies are gluten free, dairy free, egg free, vegan, and paleo friendly.
Prep time: 15
Cook time: 0
Total time: 45 minutes (including 30 minutes for chilling)
Yield: 1 dozen
Ingredients
  • 1/2 cup oats, ground to flour
  • 1/2 cup cold milled golden flax seed
  • 1 scoop vanilla protein powder
  • 2 Tablespoons coconut butter
  • 1/4 teaspoon vanilla extract
  • 1/4 teaspoon coconut extract
  • 1 Tablespoon coconut flour
  • 2 Tablespoons organic unsweetened coconut flakes
  • Pinch Himalayan pink salt
  • 2 Tablespoons Honey
  • 1/2 cup Silk coconut milk, unsweetened
  • 1/4 cup organic unsweetened coconut flakes for rolling
Directions
  1. Line 1 cookie sheet with parchment paper. Set aside.
  2. Place 1/4 cup of coconut flakes into a small bowl. Set aside.
  3. In a large bowl, combine all ingredients and mix together.
  4. Take about 1 Tablespoonful of dough and roll into a ball between your hands.
  5. Roll ball shaped dough in bowl of coconut flakes.
  6. Place cookie ball on prepared cookie sheet and gently press down with finger tips or palm of your hand.
  7. Repeat process for remaining dough.
  8. Eat immediately or place in refrigerator to let chill so dough can set up.
  9. Store with cookies on parchment paper (to prevent sticking) in an airtight container for up to 1 week.

*Helpful Hints*

- can use sea salt in place of Himalayan pink salt.

- recipe for coconut butter coming soon!

Recipe inspired by ~ Arman's No Bake Vanilla Cake Batter Breakfast Cookies over at The Big Man's World.

All content and images are property of Sweet and Spicy Monkey. Please do not reprint this content without my permission. If you wish to include this recipe on your site, please re-write in your own words and use your own photographs and link back to this post for original recipe.
Follow Julie's board Sweet and Spicy Monkey on Pinterest.

Featured here ~ Savoring Saturdays @ It's a Love/Love Thing
Shared with: Savoring Saturdays

Friday, May 29, 2015

Strawberry Salsa


Remember, my Pineapple salsa I made a few weeks ago? Where I combined tropical pineapple with spicy salsa? Well, if you love spicy mixed with a little sweetness, then you are going to L-O-V-E the taste of strawberries in this salsa!

Fresh strawberries combined with cool cucumbers and spicy jalapeños. It wakes up your taste buds that have been sleepwalking through all of your meals over the last few days, months, or even years.

And the best part about this salsa, you can eat it with plain tortilla chips or you can pair it with cinnamon sugar tortilla chips for an entirely different snack.


Whatever you thought about salsa before, my Strawberry Salsa is sure to change the way you think about salsa from now on.

Strawberry Salsa

Recipe by Julie Murphy
A sweet & fruity twist on traditional salsa.
Prep time: 7 minutes
Cook time: 0
Total time: 7 minutes
Yield: 1 and 1/2 cups salsa
Ingredients
  • 4 strawberries, pureed
  • 1 cup whole strawberries, diced
  • 1 teaspoon lime juice
  • 1 teaspoon fresh cilantro, diced
  • 9 slices (about 1/2 of a whole) English cucumber, diced
Directions
  1. Puree 4 strawberries. Place into a medium bowl.
  2. Add diced strawberries, lime juice, cilantro, and cucumber to pureed strawberries. Mix together.
  3. Serve with tortilla chips, cinnamon sugar tortilla chips, or over vanilla ice cream.
  4. Store refrigerated in an airtight container for up to 1 week.

All content and images are property of Sweet and Spicy Monkey. Please do not reprint this content without my permission. If you wish to include this recipe on your site, please re-write in your own words and use your own photographs and link back to this post for original recipe.
Follow Julie's board Sweet and Spicy Monkey on Pinterest.

Shared with ~ Freedom Fridays with All My Bloggy Friends #89

Sunday, May 24, 2015

Iceberg Lettuce Wedge Salad with Greek Yogurt Bleu Cheese Dressing


This week’s #letsgetfoodiechallenge from Amanda is for us to create our best recipe with green, in honor of National Vegetarian week which ran from the 18th to the 24th of May.

All your life, ever since you were a small child, (even though some of you still might be!) you've been told to eat your vegetables. Most people (kids and adults) hate eating their vegetables because ....well, because vegetables just don't taste as good as potato chips, fast food, and candy. And I hate to be the one to burst your bubble, but potato chips don't count as a serving of vegetables (I'm so sorry!). However, vegetables can taste good when made correctly with lots of flavor and without all the fat and calories.

I'm about to share with you a recipe for a simple salad that's easy to make and a Greek yogurt bleu cheese dressing that tastes just as good as the fat laden version. What better way to try this healthy bleu cheese dressing than on a simple wedge salad.


Yes, another two recipes on one post! Boy, y'all are just getting it from me these last few weeks! I hope you enjoy this recipe and for all the food challenge recipes, just search #letsgetfoodiechallenge and see what other dishes the other guys and gals are making.


Bon Appetit!

Iceberg Lettuce Wedge Salad

Recipe by Julie Murphy
An easy and healthy way to serve individual salads.
Prep time: 12
Cook time: 3 minutes, for the edamame
Total time: 15 minutes
Yield: 4 individual salads
Ingredients
  • 1 head iceberg lettuce, rinsed
  • 1 package grape tomatoes, rinsed
  • 1 English cucumber, washed and sliced
  • 1 avocado, sliced
  • 1 package edamame, cooked and hulled
  • 1 Tablespoon lime juice
  • 1 small package fresh chives, rinsed and diced
  • dash Salt & pepper
Cooking Directions
  1. Edamame is best prepared the night before so it can cool down and absorb the lime juices. Prepare edamame as directed on package. Hull edamame so you're left only with the edamame beans.
  2. Place edamame in a small bowl. Add lime juice and a pinch of sea salt. Cover and refrigerate to let chill.
  3. To prepare your wedge salad, cut head of lettuce into quarters and place on plates.
  4. Prepare other ingredients and place around lettuce quarters.
  5. Dollop bleu cheese dressing over lettuce and garnish with chives, edamame, avocado, and remaining bleu cheese crumbles.
  6. Salt and pepper as desired.
  7. Best served with extra dressing on side.

Greek Yogurt Bleu Cheese Dressing

Recipe by Julie Murphy
A delicious healthy version of the classic bleu cheese dressing.
Prep time: 5
Cook time: 0
Total time: 5
Yield: 2 cups
Ingredients
  • 1 cup Plain Greek yogurt, nonfat
  • 2 teaspoons white balsamic vinegar
  • 5 Tablespoons extra virgin olive oil
  • 1 Tablespoon lime juice
  • 4 ounces Bleu cheese crumbles
  • 1 clove garlic, minced
Cooking Directions
  1. Add all ingredients into a blender or food processor and blend until combined. Dressing will be thick. If you prefer your dressing a little thinner, you can add a little more lime juice or olive oil.
  2. Place into small jar or bowl and chill in the refrigerator until ready to serve.
  3. Can store covered in the refrigerator for up to 2 weeks.

Follow Julie's board Sweet and Spicy Monkey on Pinterest.

Tuesday, May 5, 2015

Homemade Pineapple Salsa


Today is Cinco de Mayo, one of my favorite Holidays of the year because it gives me an excuse to eat Mexican food! Not that I need an excuse to eat Mexican food because I just love it...but I have a reason today! {smile}

Now I didn't think I was going to be able to share this recipe with you today as I just made this delicious pineapple salsa this morning. And I still had to write out the recipe, take photos, edit, and double edit all myself.

Whew, that sounds like so much to do before the celebrations start this evening! So I'm going to get right to the recipe so you still have time to run to the store, pick up your ingredients, and whip up this salsa before your guests arrive...or the family comes home for dinner.


Whichever one it is, they're going to love this salsa made with all natural ingredients. Yep, no bottled salsa here. This is made with fresh tomatoes, onions, jalapeños, cilantro, garlic, with both lemon and lime juice. Plus you can make it depending on your tastes, mild, medium, or hot. And it’s so easy to make.

Now the pineapple was a last minute addition, and I only had a few chunks of fresh pineapple on hand, so I used canned pineapple chunks too. But the flavoring is so much better with the fresh pineapple chunks. Whichever you have available to you, the pineapple really makes this salsa!


Ok, enough from me, onto the recipe. With that said, I raise my chip to you (full of fresh pineapple salsa, of course) and wish you a Happy Cinco de Mayo!


Homemade Pineapple Salsa

Recipe by Julie Murphy
A delicious homemade pineapple salsa
Prep time: 20
Cook time: 0
Total time: 30
Yield: 1 and 1/2 Liters
Ingredients
  • 6 tomatoes
  • 2 cups fresh pineapple chunks (or 1 - 20 ounce can of pineapple chunks, drained)
  • 2 jalapenos, seeded
  • 1 sweet yellow onion
  • 1 small red onion (or 1/2 of a large one)
  • 1 cup fresh cilantro
  • 6 garlic cloves
  • 2-3 Tablespoons fresh lime juice
  • Juice of 1 lemon
  • 1 teaspoon agave nectar
  • 1 Tablespoon Cumin
  • 1 teaspoon chili powder
  • 1/2 to 1 teaspoon sea salt
  • Pinch paprika
  • 2-3 dashes ground black pepper
Directions
  1. If you like a chunky salsa (like me) leave a couple of the tomatoes and 1/2 of the sweet onion out and chop by hand. Adding into large pitcher and setting aside.
  2. While you place all other ingredients into a food processor or blender and pulse until you get desired texture and add into pitcher.
  3. Stir together well, making sure to blend ingredients on bottom of pitcher into mixture. A wooden spoon works well for this.
  4. Serve immediately or you can cover and refrigerate until serving.
  5. Best served with tortilla chips, nachos, tacos, eggs, or any Mexican dish.
  6. Refrigerate in a covered container for up to 1 week.


*Helpful Hints*

- Wear gloves when cutting and seeding the jalapenos.

- If you like a Hot salsa, leave the seeds in the jalapenos.

- For a milder salsa, you can leave out the jalapenos.

- Remember, its much easier to add salt than fix a too salty dish, so add little salt at a time to taste.


All content and images are property of Sweet and Spicy Monkey. Please do not reprint this content without my permission. If you wish to include this recipe on your site, please re-write in your own words and use your own photographs and link back to this post for original recipe.
Follow Julie's board Sweet and Spicy Monkey on Pinterest.

Wednesday, April 29, 2015

Healthy Nutella Protein Balls


Just when you thought you couldn't eat Nutella anymore because of all the sugar loaded in it, I'm about to make your day.  I've come up with healthy protein balls that taste like Nutella, but without all the added sugar and they help curb the Hunger monster too.

Y’all know what I’m talking about when I say the Hunger monster. It’s the moment when hunger strikes you, usually when you don’t have anything healthy on hand and you end up devouring anything and everything in sight.

It strikes when boredom sits in, during the afternoon slump between 2:00 and 5:00 p.m., whenever you get a mad craving, or sometimes it attacks you when you least expect it! The Hunger monster is a dieter’s worst enemy, wreaking havoc on good, healthy food plans everywhere.


Now I have to say while I was making these, I had to sample the original Nutella to make sure I had the right taste. I had just a little taste and boy, I was surprised at how sweet it was!

I love Nutella, but I didn't realize how sweet it really was until I tried it. I don't know if it was because I had just finished up the Sugar Crush Challenge or if it was because I hadn't had it in such a long time, but it really knocked my socks off! These protein balls don't taste quite that sweet, mainly because I didn't load them up with sugar. Instead I used dates and just a tad of honey to help hold them together.


And since I don't have hazelnuts available to me at the time I made these delicious little treats, I kinda cheated and added hazelnut flavoring.  So they still have the chocolatey hazelnut flavor that is so reminiscent of Nutella.

So when you feel that Hunger monster coming on before or after a workout, during the afternoon slump, or whenever you feel a Nutella or chocolate craving coming on, grab one of these little Nutella protein balls and crush the Hunger monster.


Healthy Nutella Protein Balls
Recipe by Julie Murphy
A healthier version of Nutella Protein Balls without all the sugar
Prep time: 15 minutes
Total time: 15 minutes
Yield: about 2 dozen
Ingredients
  • 1 and 3/4 cups unsweetened coconut flakes
  • 6 Medjool dates, pitted and pureed
  • 1 and 1/2 Tablespoons honey
  • 2 Tablespoons coconut oil, melted
  • 1/3 cup creamy peanut butter
  • 1/2 cup cocoa nibs
  • 2 teaspoons Hazelnut extract
  • 1 Tablespoon dark cocoa powder
  • 1-2 Tablespoons dark cocoa powder for rolling
Directions
  1. Line a cookie sheet with parchment paper. Set aside.
  2. In the microwave, warm peanut butter and honey in a small cup, if needed to help make stirring easier. No more than 25 seconds should help warm them. Set aside.
  3. Measure coconut and grind in a blender or food processor until coconut flakes become finely ground.
  4. In a medium to small bowl, add the finely ground coconut flakes with warmed peanut butter and honey. Mix together well with a wooden spoon. Mixture will be sticky.
  5. Blend in melted coconut oil, dark cocoa powder, pureed dates, and hazelnut extract, mixing well.
  6. Make sure mixture is not too warm before adding in cocoa nibs because you don't want them to melt. If too warm, place mixture in refrigerator for 5-10 minutes, then fold in cocoa nibs.
  7. Gently roll about 1 Tablespoon or smaller of mixture between your palms until a ball is formed. If mixture is too sticky or falls apart, place in refrigerator for 15 to 20 minutes before making ball shapes.
  8. Roll in dark cocoa powder before placing on prepared cookie sheet.
  9. Place cookie sheet in refrigerator for at least 30 minutes to let balls set up.
  10. Store in an airtight container in the refrigerator before serving.

All content and images are property of Sweet and Spicy Monkey. Please do not reprint this content without my permission. If you wish to include this recipe on your site, please re-write in your own words and use your own photographs and link back to this post for original recipe.

Friday, April 24, 2015

Paleo Chocolate Coconut Chocolate Chip Cookies


You read that right...chocolate coconut chocolate chip cookies that are paleo friendly. Remember the Paleo Coconut Chocolate Chip Cookies I made a few weeks ago? Well these are just a more chocolatey version of those cookies and what a difference a little bit of chocolate makes as they don't even taste like the same cookies!

During my Sugar Crush Challenge last month, I was craving something sweet but I couldn't have any granulated white sugar or brown sugar. So I had to find healthier versions of my all-time favorites. And after making the paleo chocolate chip cookies, I still had a strong hankering for chocolate.


As I was thinking of what could possibly be better than coconut chocolate chip cookies, it became obvious to me that more chocolate was the answer. And that is how I came up with these chocolate coconut chocolate chip cookies that are even more healthier for you than their inspiration, Paleo Coconut Chocolate Chip Cookies.

I say “healthier” because I’ve swapped out the dark chocolate chips for organic cacao nibs which have more nutrients without any added sugars, yet you still get that delicious chocolate flavor. And we all know the benefits of having dark chocolate over milk chocolate, right? Well, if you don’t already know, dark chocolate (unsweetened, not the sugary stuff) is found to:

  • • Contain powerful antioxidants
  • • Improve blood flow which helps lower your blood pressure
  • • Raises HDL and helps protect LDL against oxidation
  • • Lowers your risks of heart disease
  • • Improves brain function

Who’d have thought adding more chocolate to your diet would be better for you? And you thought eating healthy meant cardboard and tasteless foods.


Times are a’changing baby!

By the way for all who are wondering, I've completed my Sugar Crush Challenge. I have to say it opened my eyes to how much sugar is in the everyday foods we eat on a daily basis. And I'm not talking just desserts here. Sugar is in almost everything we eat like ketchup, yogurt, orange juice, milk - dairy milk, almond, cashew, and coconut milk included. Add that together with the other foods you eat and the sugar grams quickly increase for the day.

I lost ten pounds by cutting out sugar from my diet and I feel better too. So after completing the challenge, I'm going to continue watching the sugar content in my diet although I will still be making sweets too, just in moderation now. If you haven't already, I highly advise you to try the Sugar Crush Challenge and let me know if it helps you clean up your diet.

Paleo Chocolate Coconut Chocolate Chip Cookies

Recipe by Julie Murphy
Prep time: 8 minutes
Cook time: 10-15 minutes
Total time: 30 minutes
Yield: 1 dozen cookies
Ingredients
  • 1/3 cup organic coconut flour
  • 1/3 cup organic cacao nibs
  • 1/3 cup pecans, chopped
  • Pinch sea salt
  • 2 eggs
  • 1/4 cup organic cold-pressed, virgin coconut oil, melted
  • 1/4 cup honey
  • 1 teaspoon vanilla extract
  • 1 Tablespoon dark cocoa powder
  • 2 Tablespoons organic unsweetened coconut flakes
Cooking Directions
  1. Preheat oven to 350F degrees.
  2. Line cookie sheet (2 if you have available, otherwise, just use one cookie sheet will do) with parchment paper. Set aside.
  3. In a medium to large mixing bowl, add coconut flour, sea salt, eggs, melted coconut oil, honey, vanilla, and cocoa powder. Mix together until all ingredients are blended. Making sure to scrape the bottom and sides of the bowl with a spatula to get all the coconut flour blended in. Texture will be reminiscent of normal cookie dough. It might take a little longer for the coconut flour to soak in the wet ingredients. If using a stand mixer, about 5 minutes longer. If texture is still runny, add in coconut flour a little at a time until you achieve correct texture.
  4. By hand, fold in coconut flakes, pecans, and cacao nibs.
  5. Using a Tablespoon or pre-set cookie spoon, drop onto prepared cookie sheet, about 2 inches apart.
  6. Gently press down cookie with your fingers or palms, as cookies will not spread out during baking.
  7. Bake for 10 - 15 minutes. You will not be able to see these cookies turn a golden brown in color that is usually a sign to take them out of the oven, so keep a watchful eye on them as you do not want to burn.
  8. Remove from oven and let cool on cookie sheet for 5 minutes before transferring to a wire rack where they can cool completely.
  9. Store in an airtight container for up to 1 week. But trust me, they won't last that long!
  10. Cookies will retain a soft texture during storage.

Benefits of Dark Chocolate found here.
 
All content and images are property of Sweet and Spicy Monkey. Please do not reprint this content without my permission. If you wish to include this recipe on your site, please re-write in your own words and use your own photographs and link back to this post for original recipe.
Follow Julie's board Sweet and Spicy Monkey on Pinterest.

Saturday, April 18, 2015

No Bake Protein Bites


Have you seen these yet? Silly question, I know, because you probably have since they're all over Pinterest these days. These little balls that they're calling protein balls, raw balls, or cookie dough balls.

Well, if you haven't seen them yet, I'm about to introduce you. These little balls are delicious and packed with all this good for you stuff to help you survive that afternoon slump we all get between the hours of 2-5 p.m. Or they're great to pop in before or after a workout.


Whenever you eat one of these little balls, they're sure to put a little kick in your step. And they help curb any sweet cravings you have too! I'm speaking from experience here because these little balls helped me during my Sugar Crush Challenge last month. If it weren't for these little balls, I might not have survived and ate up all the sugar in sight!

I keep referring to them as "little balls" when in fact they should be called little protein bites. These protein bites might be little in size, but they're just enough to help pick you up or satisfy any sugar cravings without adding a lot of calories to your daily intake.

And you can make them in different flavors like I did here by rolling them in cocoa powder, unsweetened coconut flakes, or both. Or you can add nuts and dried fruit. The possibilities are endless.


No Bake Protein Bites
Recipe by Julie Murphy
Little bites of protein
Prep time: 15 minutes
Total time: 15 minutes
Yield: 15, depending on how big you make them
Ingredients
  • 1 and 3/4 cups unsweetened coconut flakes
  • 6 Medjool dates, pitted and pureed
  • 1 Tablespoon honey
  • 1 and 1/2 Tablespoons coconut oil, melted
  • 1/3 cup creamy peanut butter
  • 1/3 cup cocoa nibs
  • 2 Tablespoons unsweetened coconut flakes for rolling (optional)
  • 2 teaspoons dark cocoa powder for rolling (optional)
Directions
  1. Line a cookie sheet with parchment paper. Set aside.
  2. In the microwave, warm peanut butter and honey in a small cup, if needed to help make stirring easier. No more than 25 seconds should help warm them. Set aside.
  3. Measure coconut and grind in a blender or food processor until coconut flakes become finely ground.
  4. In a medium to small bowl, add the coconut along with warmed peanut butter and honey. Mix together well with a wooden spoon. Mixture will be sticky.
  5. Blend in melted coconut oil and pureed dates, mixing well.
  6. Make sure mixture is not too warm before adding in cocoa nibs because you don't want them to melt. If too warm, place mixture in refrigerator for 5-10 minutes, then fold in cocoa nibs.
  7. Gently roll about 1 Tablespoon or smaller of mixture between your palms until a ball is formed. If mixture is too sticky, place in refrigerator for 30 minutes before making ball shapes.
  8. You can roll in either cocoa powder or flaked, unsweetened coconut before placing on prepared cookie sheet.
  9. Place cookie sheet in refrigerator for at least 30 minutes to let balls set up.
  10. Store in an airtight container in the refrigerator before serving.


All content and images are property of Sweet and Spicy Monkey. Please do not reprint this content without my permission. If you wish to include this recipe on your site, please re-write in your own words and use your own photographs and link back to this post for original recipe.
Follow Julie's board Sweet and Spicy Monkey on Pinterest.

Shared with: Busy Monday 161, Savoring Saturdays

Wednesday, April 8, 2015

Carrot Cake Chia Pudding


I'm near the end of my Sugar Crush Challenge so I'm still experimenting with sugar free sweets. And I'm so happy I've stumbled upon this idea of Carrot Cake Chia Pudding, inspired by Ali's smoothie over at Gimme Some Oven.

I used Medjool dates for natural sweetness and instead of a smoothie, I made mine a pudding. If you would like this as a smoothie, just use two tablespoons of chia seeds instead of three.


Oh my, it's everything a carrot cake is - a lightly spiced, sweet delight! All in a healthy chia pudding without all the sugar and calories that comes with a slice of cake.

It even has the same coloring as a slice of carrot cake!
So go ahead and make yourself some of this today and indulge in every bite because....well, because you deserve it after all you've done {smile}!


------------------------------------------------------------
Carrot Cake Chia Pudding
Recipe by Julie Murphy
Prep time: 5 minutes
Total time: 5 minutes
-------------------------------------------------------------
Ingredients
  • 1 cup coconut milk
  • 1/4 cup plain Greek yogurt
  • 1 frozen banana, sliced
  • 2 carrots, peeled and sliced
  • 3 Medjool dates, pitted
  • 2 Tablespoons unsweetened, flaked coconut
  • 1 scoop Vanilla protein powder
  • 1/4 + 1/8 teaspoon ground cinnamon
  • 1/16 teaspoon ground ginger
  • dash ground nutmeg
  • 3 Tablespoons chia seeds
 
Directions
  1. Add coconut milk, yogurt, frozen banana, carrot slices, and dates into a blender.
  2. Pulse on High setting for no more than 10-12 seconds, repeating until all ingredients are pureed.
  3. Remove lid and add remaining ingredients. Repeat pulsing on High setting, should take no more than 3-5 times to have all ingredients blended together smoothly.
  4. Pour into a medium bowl, cover, and refrigerate overnight.
  5. Can serve with flaked, unsweetened coconut, raisins, chopped walnuts, fresh or dried pineapple, and/or carrot slices or peelings sprinkled over the top as shown.
       

*Helpful Hints*

- If you're not using a high speed blender, use carrot peelings instead of carrot slices, so you do not damage your blender.

- Easy way of how to prepare your banana - peel, chop into slices, place in Ziploc bag, and freeze overnight.
 
All content and images are property of Sweet and Spicy Monkey. Please do not reprint this content without my permission. If you wish to include this recipe on your site, please re-write in your own words and use your own photographs and link back to this post for original recipe.
Follow Julie's board Sweet and Spicy Monkey on Pinterest.

Shared with: Savoring Saturdays, Munching Mondays #86, Totally Terrific Tuesday Link Party #28